Getting Started with Deployments
This topic walks you through creating your first deployment pipeline in Harness Continuous Delivery (CD).
Start with the CD overview to understand key concepts, including services, environments, pipelines, and deployment strategies.
What will you learn in this topic?
- How to create a deployment pipeline.
- How to add a Deploy stage and configure your deployment.
- How to configure a service to define what to deploy.
- How to set up an environment and infrastructure to define where to deploy.
- How to choose an execution strategy for your deployment.
- How to run your first deployment.
Before you begin
Ensure you have the following:
- A Harness account: Sign up for free.
- Access to a Harness project: Use the Default Project or create your own.
Platform setup
Select your deployment platform to get started with the required setup and connectors.
- Kubernetes
- SSH / Traditional
- Google Cloud Run
- Azure
- AWS Lambda
Set up your Kubernetes cluster and configure the required connectors to deploy containerized applications with Harness CD.
Infrastructure requirements:
- A Kubernetes cluster (local like K3D, or cloud-managed like GKE, EKS, AKS).
kubectlaccess to your cluster.- Application deployed to a container registry (Docker Hub, ECR, GCR, and so on).
- A Harness Delegate installed: Required to connect to your cluster. Go to the delegate installation guide to install one.
Quick verification:
# Verify kubectl access
kubectl cluster-info
kubectl get nodes
Required connectors:
-
Kubernetes Cluster Connector: Connects Harness to your cluster.
- Go to Project Settings > Connectors > New Connector > Kubernetes Cluster.
- Choose connection method (Delegate, Service Account, and so on).
- Go to Create a Kubernetes connector for detailed steps.
-
Git Connector: For storing Kubernetes manifests.
- Go to Project Settings > Connectors > New Connector > GitHub/GitLab/Bitbucket.
- Provide repository URL and authentication (Personal Access Token recommended).
- Go to Git connector setup for detailed steps.
-
Docker Registry Connector: For pulling container images.
- Go to Project Settings > Connectors > New Connector > Docker Registry.
- For Docker Hub: Use
https://registry.hub.docker.com/v2/. - For ECR/GCR/ACR: Use respective registry URLs.
- Go to Docker Registry connector for detailed steps.
Prepare your target hosts and configure the required connectors to deploy applications to virtual machines or physical servers over SSH.
Infrastructure requirements:
- Target VMs or servers (on-premises or cloud)
- SSH key-based authentication configured
- Application artifacts in a repository (Artifactory, Nexus, S3, and so on)
- A Harness Delegate installed: Required to execute deployment commands on your servers. Go to the delegate installation guide to install one.
SSH key setup:
# Generate SSH key if needed
ssh-keygen -t rsa -b 4096 -f ~/.ssh/harness_deploy

# Copy public key to target servers
ssh-copy-id -i ~/.ssh/harness_deploy.pub user@server-ip
Required connectors:
-
SSH Key Secret: Store your private SSH key.
- Go to Project Settings > Secrets > New Secret > File.
- Upload your private SSH key file.
- Go to SSH secret setup for detailed steps.
-
SSH Connector: Connects to your servers.
- Go to Project Settings > Connectors > New Connector > SSH.
- Provide host details and select SSH key secret.
- Go to Add and reference SSH secrets for detailed steps.
-
Artifact Repository Connector: For application packages.
- For Artifactory: Go to Connectors > New Connector > Artifactory.
- For Nexus: Go to Connectors > New Connector > Nexus.
- For S3: Go to Connectors > New Connector > AWS > Configure S3 access.
- Go to Artifactory connector settings for detailed steps.
Configure your Google Cloud environment and the required connectors to deploy containerized applications to Cloud Run.
Infrastructure requirements:
- A GCP project with billing enabled.
- For Cloud Run: Cloud Run API enabled.
- For GKE: A GKE cluster.
- Container image in GCR or Artifact Registry.
Enable required APIs:
# Enable Cloud Run API
gcloud services enable run.googleapis.com

# Enable Artifact Registry
gcloud services enable artifactregistry.googleapis.com

# Enable Container Registry (if using GCR)
gcloud services enable containerregistry.googleapis.com
Required connectors:
-
GCP Connector: Connects Harness to Google Cloud.
- Go to Project Settings > Connectors > New Connector > GCP.
- Choose authentication: Service Account Key or GCE VM.
- Provide service account key (JSON) with required permissions.
- Go to GCP connector setup for detailed steps.
Required GCP permissions:
- Cloud Run:
roles/run.admin - Artifact Registry:
roles/artifactregistry.reader - GKE:
roles/container.developer
-
Git Connector (if using Git for manifests).
- Go to Project Settings > Connectors > New Connector > GitHub/GitLab.
- Provide repository URL and authentication.
- Go to Git connector setup for detailed steps.
-
GCR/Artifact Registry Connector: For container images.
- Go to Project Settings > Connectors > New Connector > GCR/GAR.
- Select your GCP connector.
- Specify registry hostname.
- Go to GCR connector setup for detailed steps.
Set up your Azure environment and configure the required connectors to deploy applications to Azure services.
Infrastructure requirements:
- An Azure subscription with appropriate permissions.
- For Functions: Function App created in Azure Portal.
- For Web Apps: App Service plan configured.
- Application package or container image ready.
Azure CLI verification:
# Login to Azure
az login

# Verify subscription
az account show

# List resource groups
az group list
Required connectors:
-
Azure Connector: Connects Harness to Azure.
- Go to Project Settings > Connectors > New Connector > Azure.
- Select authentication: Service Principal or Managed Identity.
- Provide:
- Application (Client) ID
- Tenant ID
- Client Secret (create as Harness Secret first)
- Go to Azure connector setup for detailed steps.
Required Azure permissions:
- Contributor role on resource group or specific:
Microsoft.Web/sites/*for Web Apps/Functions
-
Git Connector (for configuration files).
- Go to Project Settings > Connectors > New Connector > GitHub/GitLab.
- Provide repository URL and authentication.
- Go to Git connector setup for detailed steps.
-
Azure Container Registry Connector (for containerized apps).
- Go to Project Settings > Connectors > New Connector > Docker Registry.
- Use ACR login server URL (e.g.,
myregistry.azurecr.io). - Authenticate using Azure credentials or ACR admin credentials.
- Go to ACR connector setup for detailed steps.
Prepare your AWS environment and configure the required connectors to deploy serverless applications to AWS Lambda.
Infrastructure requirements:
- An AWS account with appropriate IAM permissions.
- Lambda execution role with required policies.
- S3 bucket for deployment packages (or ECR for container images).
- Deployment package (ZIP file) uploaded to S3.
AWS CLI verification:
# Verify AWS credentials
aws sts get-caller-identity

# List S3 buckets
aws s3 ls

# Verify Lambda access
aws lambda list-functions --region us-east-1
Required connectors:
-
AWS Connector: Connects Harness to AWS.
- Go to Project Settings > Connectors > New Connector > AWS.
- Choose authentication method:
- Access Key (recommended for getting started)
- IAM Role (recommended for production)
- IRSA (for EKS)
- For Access Key method:
- Create a secret for Access Key ID.
- Create a secret for Secret Access Key.
- Go to AWS connector setup for detailed steps.
Required IAM policies:
AWSLambda_FullAccessorAWSLambdaFullAccessIAMReadOnlyAccess(for role verification)AmazonS3ReadOnlyAccess(for artifact retrieval)
-
Git Connector: For Lambda function definitions.
- Go to Project Settings > Connectors > New Connector > GitHub/GitLab.
- Provide repository URL and authentication.
- Example repo:
https://github.com/harness-community/harnesscd-example-apps. - Go to Git connector setup for detailed steps.
-
AWS Secrets: Store AWS credentials.
- Go to Project Settings > Secrets > New Secret > Text.
- Create two secrets to use in the AWS connector:
aws_access_key_id: Your AWS Access Key ID.aws_secret_access_key: Your AWS Secret Access Key.
Pre-deployment setup:
- Upload your Lambda deployment package (ZIP) to S3 bucket.
- Note the bucket name and file path - you will need these in Step 3.
- Ensure Lambda execution role ARN is ready - you will need it in the function definition.
- Complete all connector setups before proceeding. You select these connectors in the following steps.
- Test each connector. Use the Test Connection button to verify connectivity.
- Save connector identifiers. You reference these by name when configuring services and environments.
Step 1: Create your pipeline
Perform the following steps to create your first deployment pipeline:
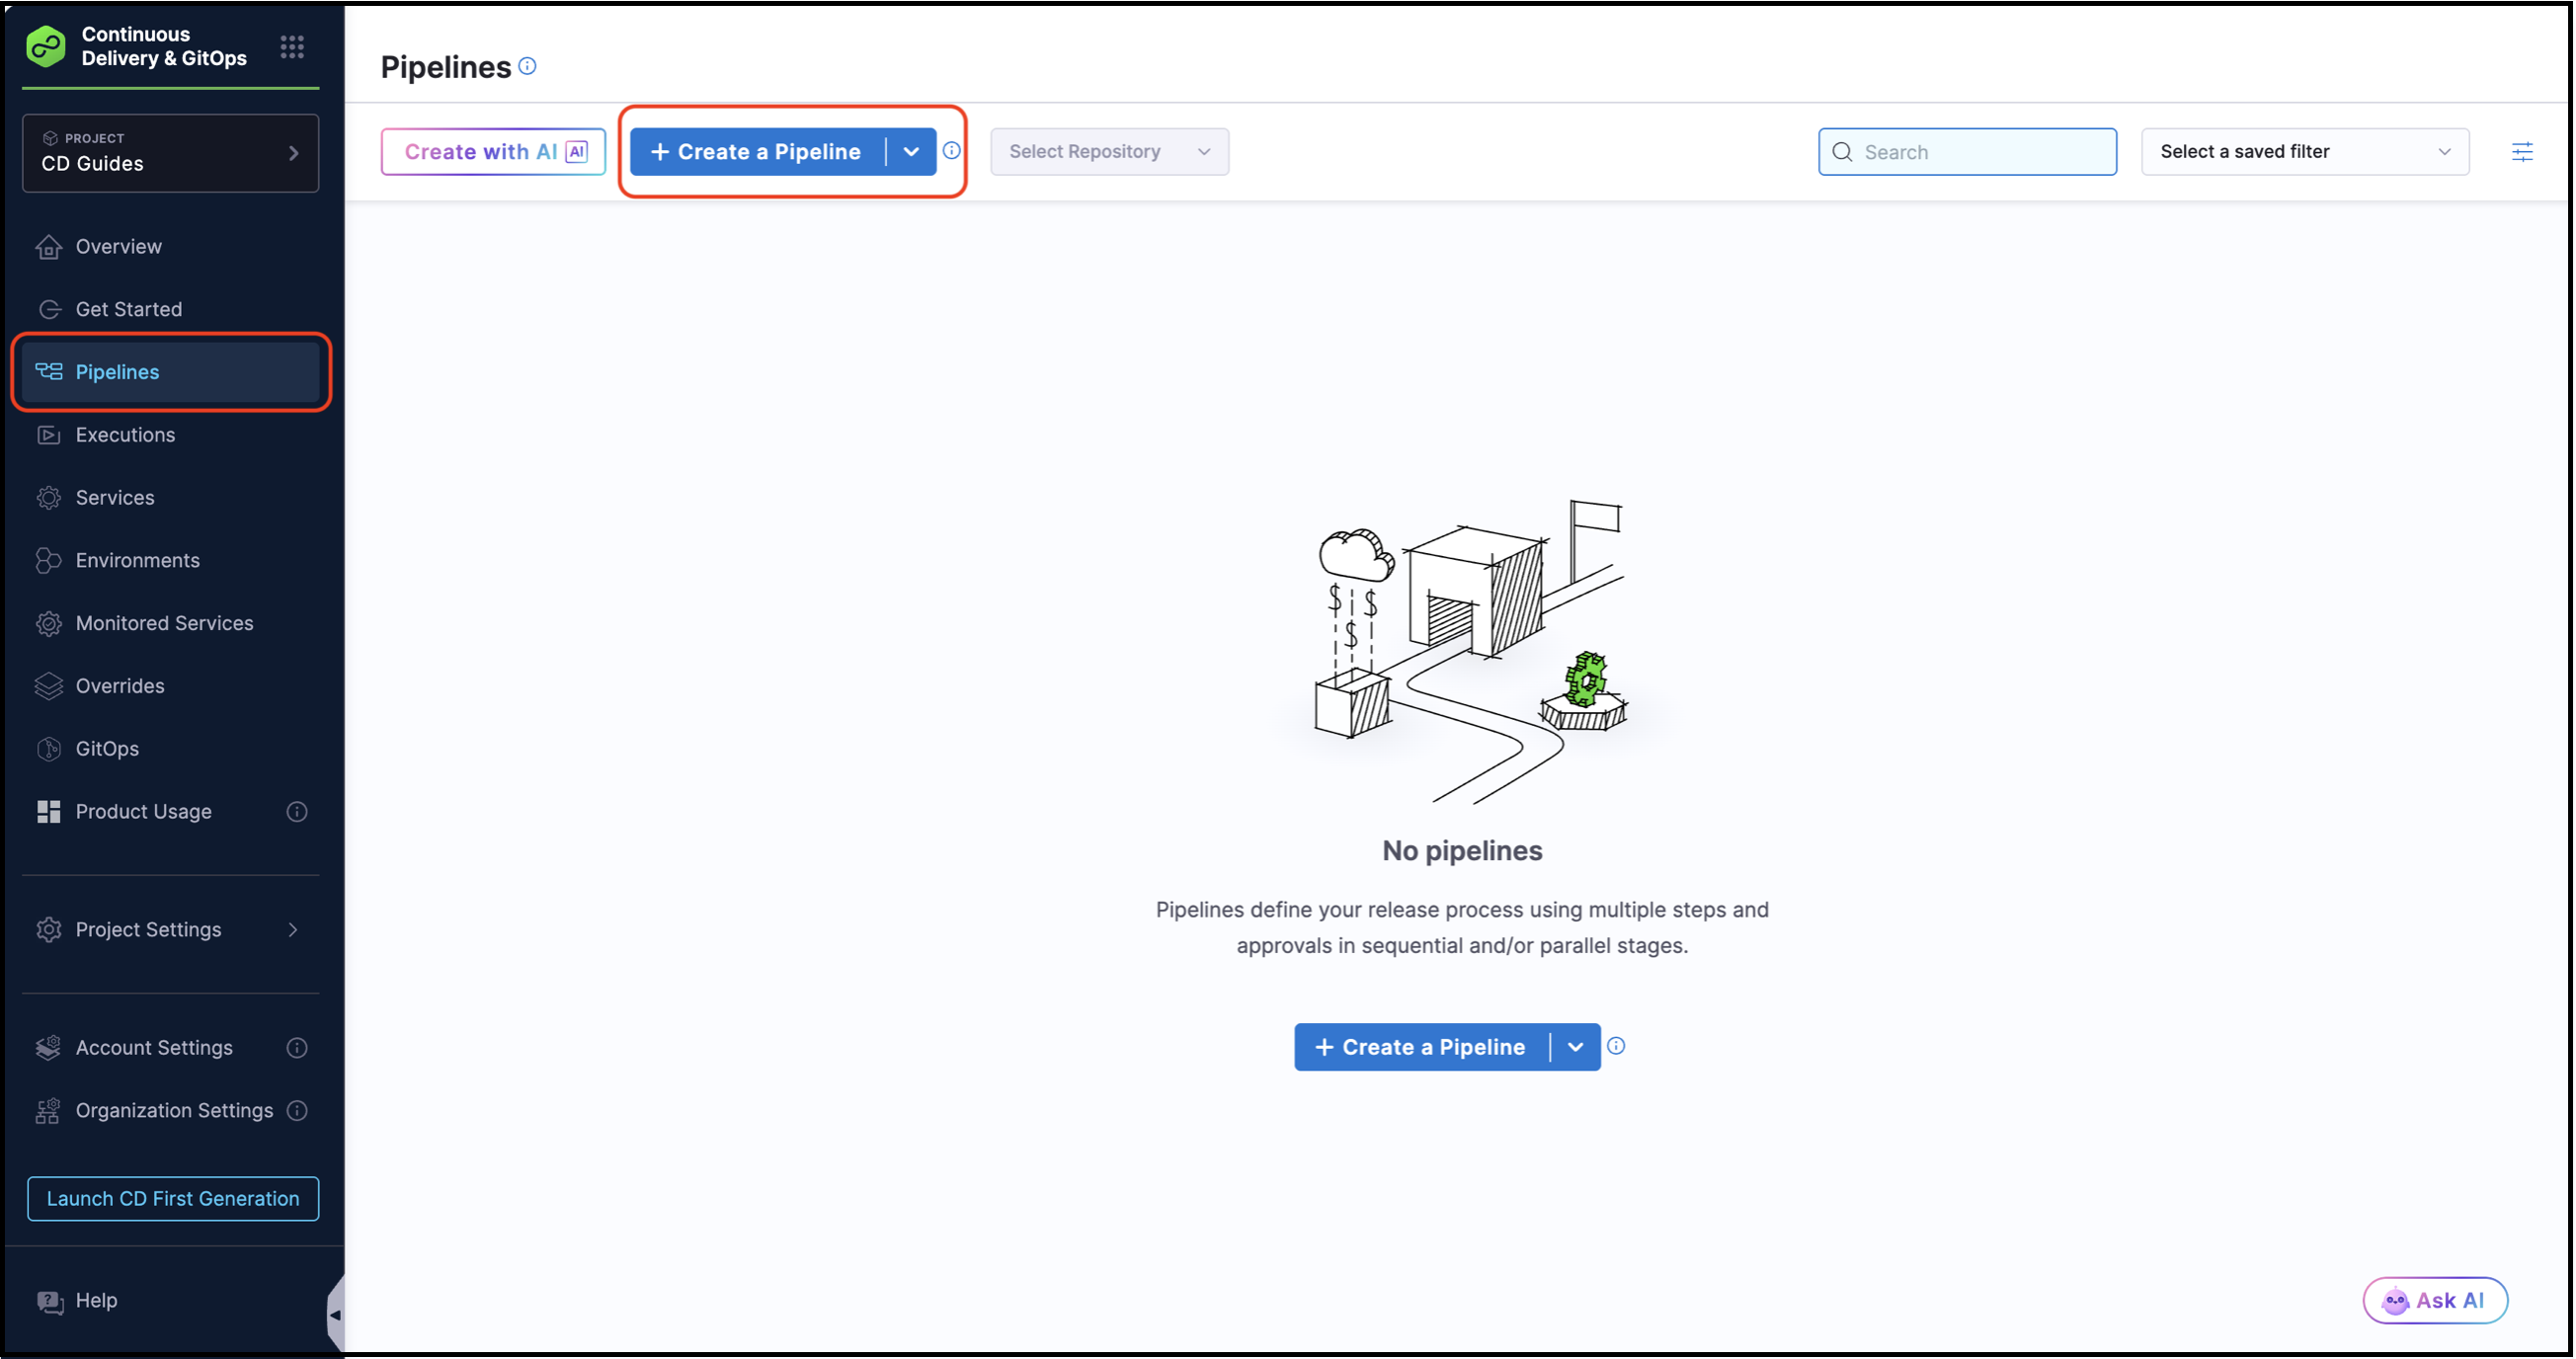
Navigate to Pipelines
- From your Harness project, select Pipelines from the left navigation menu.
- Click + Create a Pipeline.
Configure pipeline basics
- Provide a Name for your pipeline. For example, Deploy to Production.
- Select Inline for Pipeline Storage (stores configuration in Harness).
- Click Start.
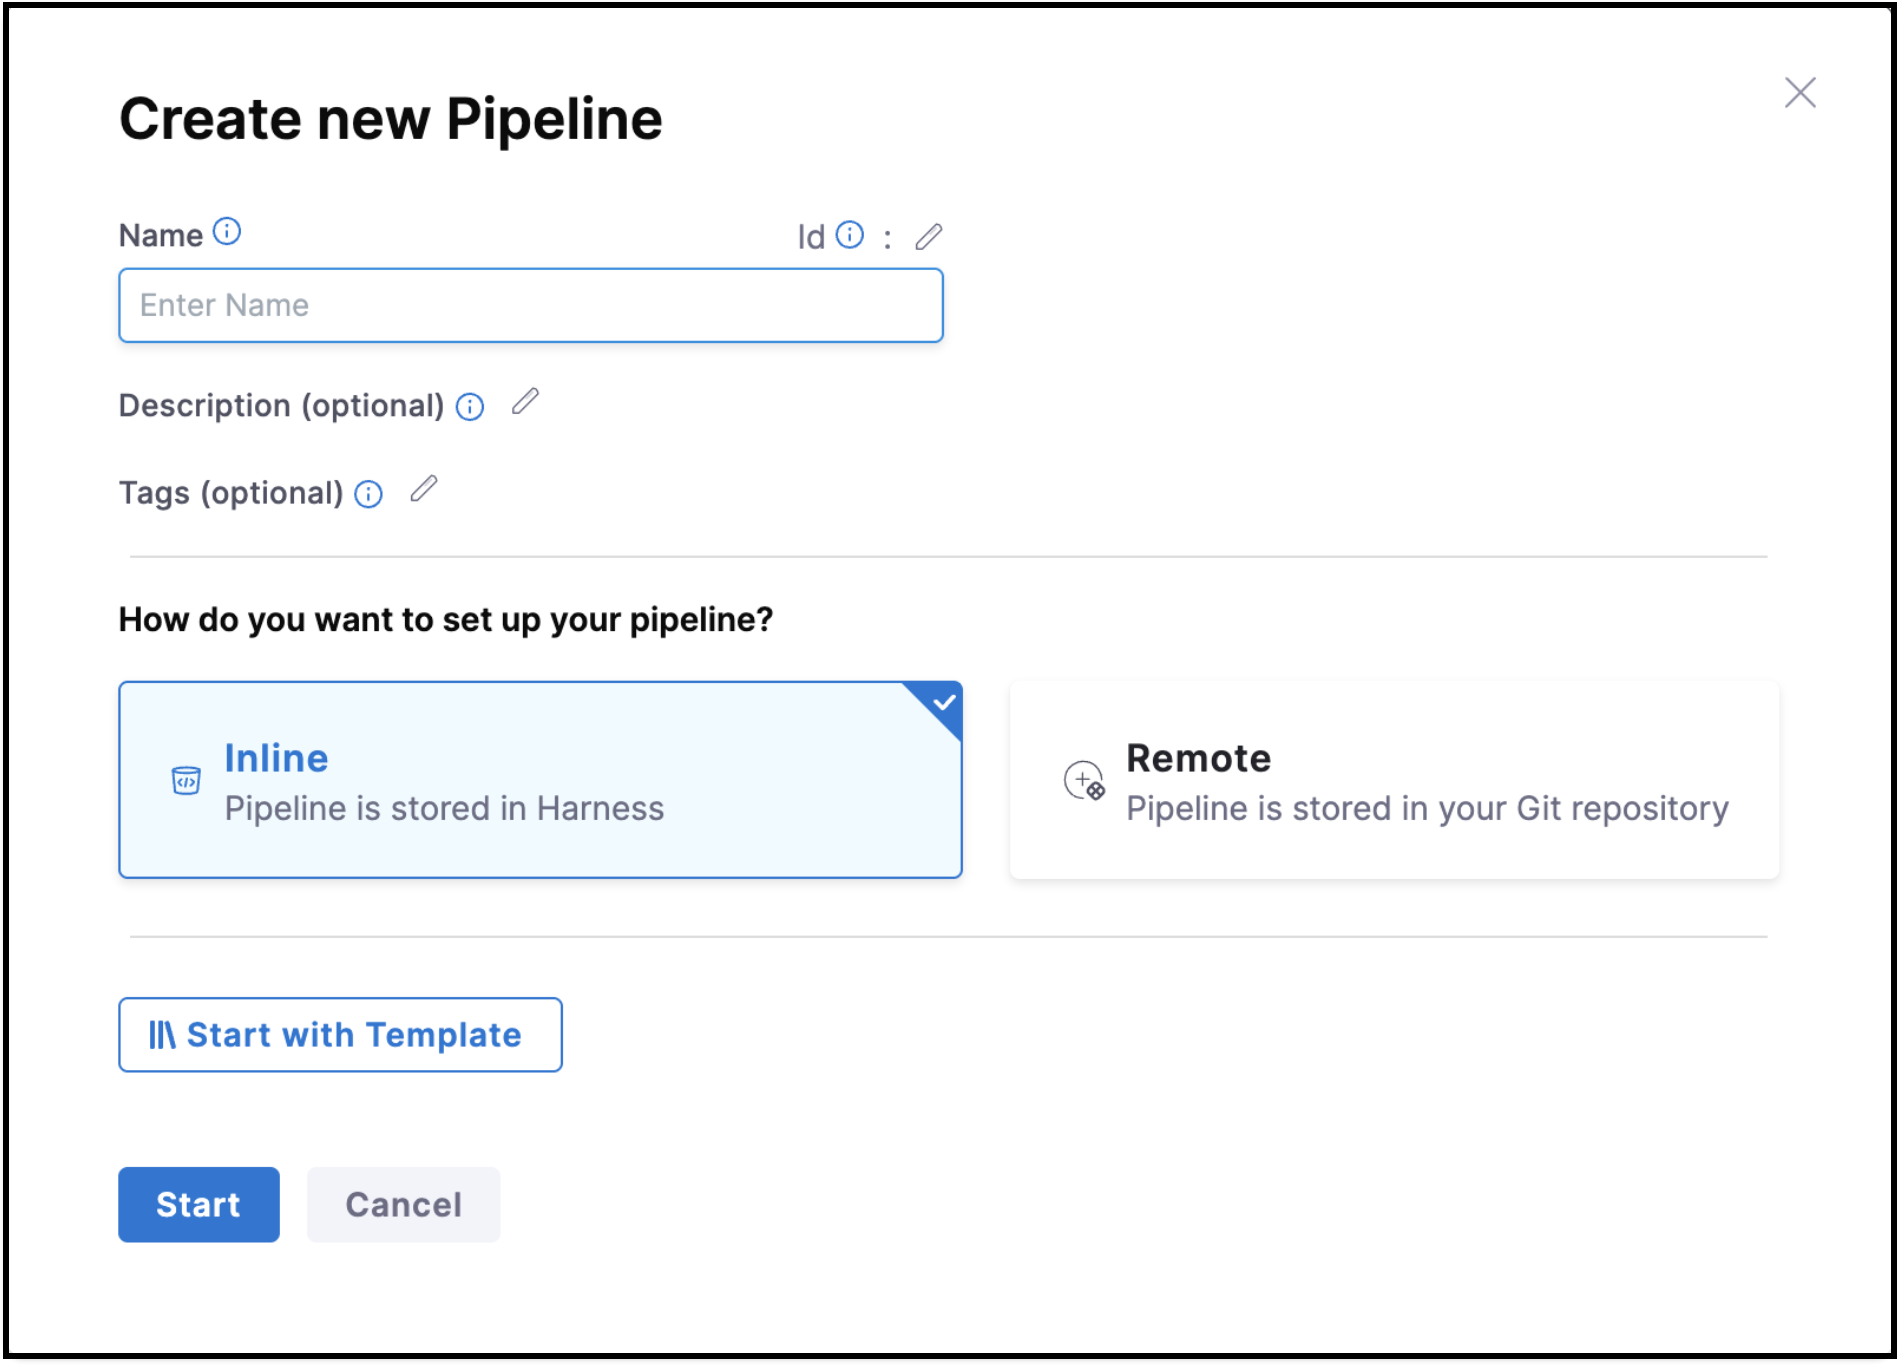
You can also store pipelines in Git using Remote storage. Go to the Pipelines documentation for details.
Step 2: Add a Deploy stage and configure deployment
Perform the following steps to add a Deploy stage and configure your deployment based on your target platform:
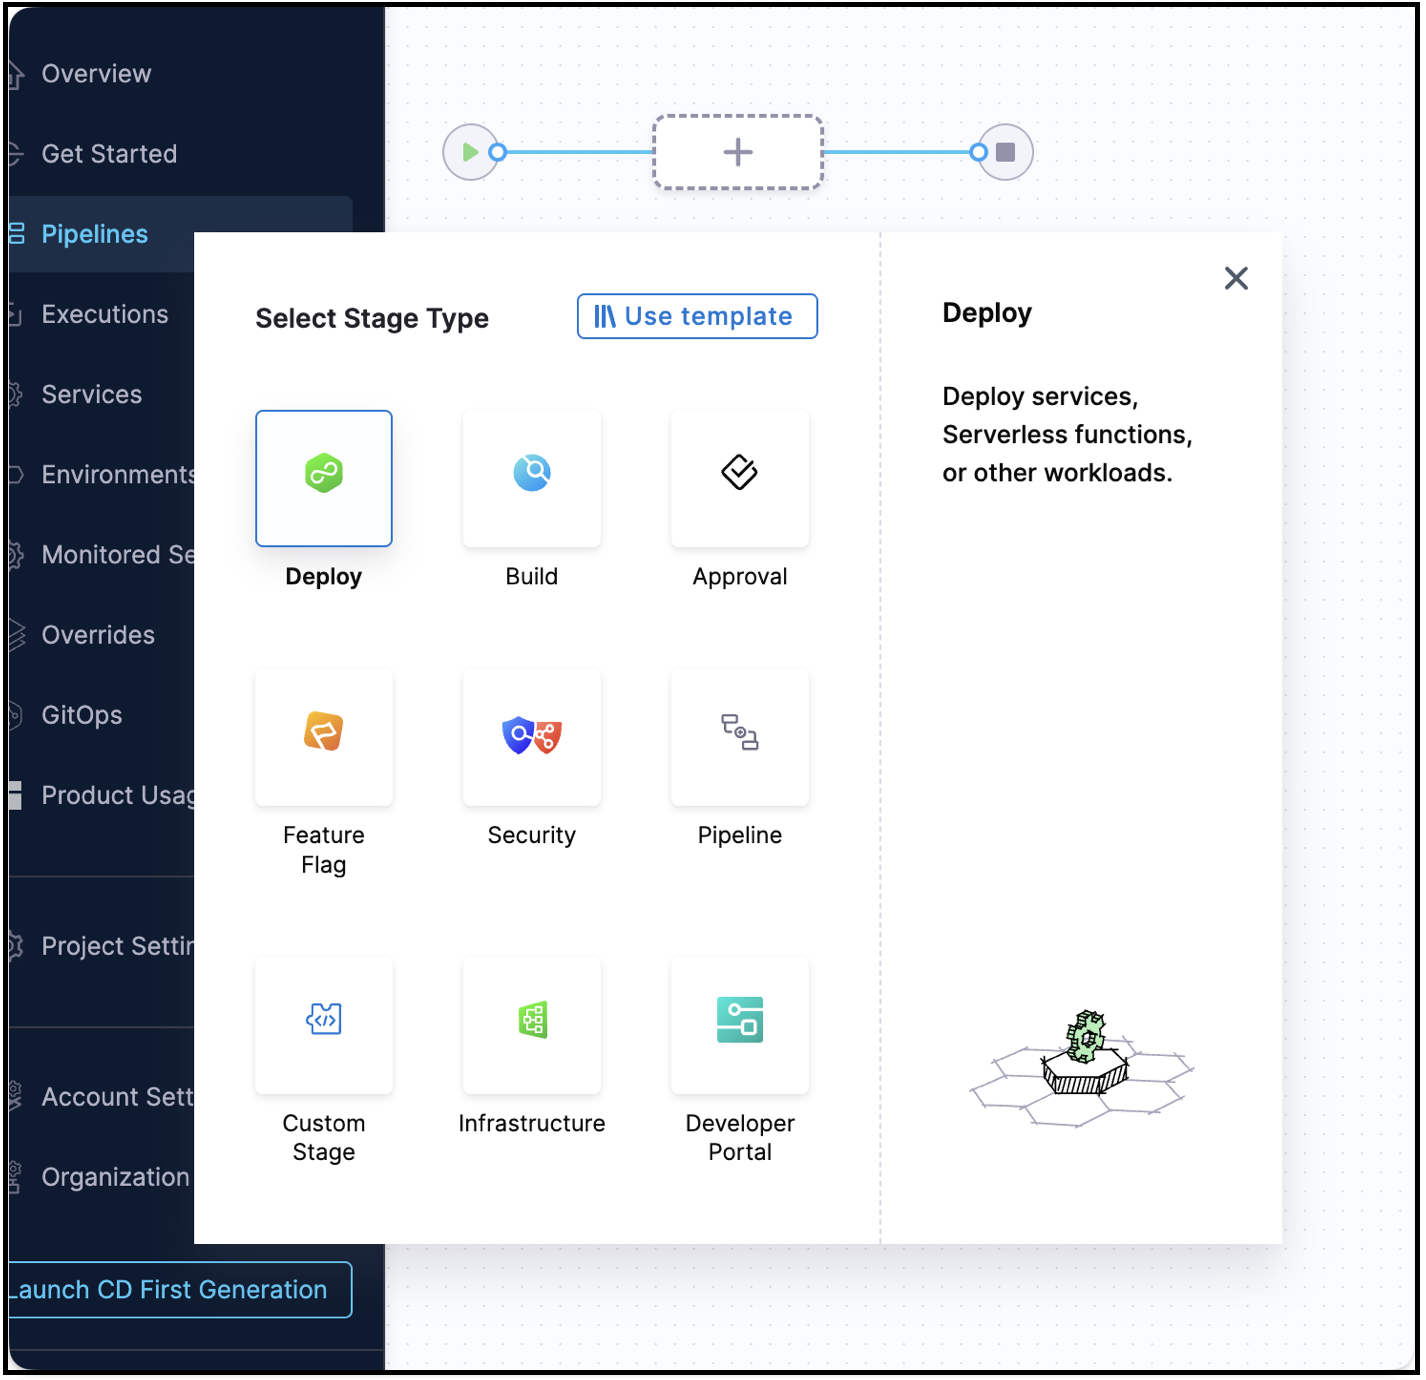
- Select the Deploy stage type.
-
In the About your Stage section:
- Enter a Stage Name. For example, Deploy to Dev.
- Select the Deployment Type that matches your infrastructure from the following:
- Kubernetes: Deploy to any Kubernetes cluster.
- AWS Lambda: Serverless functions on AWS.
- Google Cloud Run: Fully managed containers on GCP.
- Azure Web Apps: PaaS web applications on Azure.
- Azure Functions: Serverless compute on Azure.
- SSH: Deploy to Linux/Windows servers.
tipHarness supports 20+ deployment types including ECS, Helm, SAM, Google Cloud Functions, Spot, Tanzu, and more. For the complete list, go to What's Supported in CD.
-
Click Set Up Stage to continue.
The deployment type you select here determines the configuration needed in Service, Environment, and Infrastructure sections. Make sure to follow the same deployment type throughout all configuration steps.
Step 3: Configure your service
The service defines what you are deploying (application, artifacts, manifests).
Select the deployment platform based on the requirement:
- Kubernetes
- SSH / Traditional
- Google Cloud Run
- Azure
- AWS Lambda
Define the Kubernetes service by adding a manifest and a container image to deploy.
Add a service
- In the Service tab, click + Add Service.
- Provide a Name. For example,
nginx-service. - Click Save.
Add Kubernetes manifest
- Click Add Manifest.
- Select K8s Manifest.
- Configure the following:
- Manifest Identifier:
k8s-manifest. - Git Connector: Select the Git connector you created in Platform setup.
- Repository: Use
https://github.com/harness-community/harnesscd-example-apps. - Branch:
master. - File Path:
guestbook/manifest.yaml.
- Manifest Identifier:
Sample manifest:
apiVersion: apps/v1
kind: Deployment
metadata:
  name: guestbook-ui
spec:
  replicas: 3
  selector:
    matchLabels:
      app: guestbook-ui
  template:
    metadata:
      labels:
        app: guestbook-ui
    spec:
      containers:
      - name: guestbook-ui
        image: <+artifact.image>
        ports:
        - containerPort: 80
---
apiVersion: v1
kind: Service
metadata:
  name: guestbook-ui
spec:
  type: LoadBalancer
  selector:
    app: guestbook-ui
  ports:
    - protocol: TCP
      port: 80
      targetPort: 80
Add container image
- Click Add Primary Artifact.
- Select Docker Registry.
- Configure the following:
- Artifact Source Name:
nginx. - Docker Registry Connector: Select the Docker Registry connector you created in Platform setup.
- Image Path:
library/nginx. - Tag: Select
stableor use<+input>for runtime input.
- Artifact Source Name:
- Click Continue to proceed to environment configuration.
Harness also supports Helm charts and Kustomize for Kubernetes deployments.
Define the service by adding the application package to deploy to your target hosts.
Add a service
- In the Service tab, click + Add Service.
- Enter a Name. For example,
tomcat-app. - Click Save.
Add application package
-
Click Add Primary Artifact.
-
Select artifact source based on what you configured in Platform setup:
- Artifactory: For JARs, WARs, and so on.
- Nexus: For Maven artifacts.
- Amazon S3: For packages.
-
Configure the following:
- Connector: Select the artifact repository connector you created in Platform setup.
- Artifact Path: Path to your application package.
- Format: JAR, WAR, TAR, ZIP, and so on.
For example, for a WAR file from Artifactory:
- Repository:
libs-release-local. - Artifact Path:
com/example/myapp/1.0/myapp-1.0.war.
Add deployment scripts (optional)
- Click Add Config File to add installation or startup scripts.
- Add pre-deployment and post-deployment scripts as needed.
- Click Continue to proceed to environment configuration.
Harness also supports WinRM deployments for Windows servers.
Define the Cloud Run service by adding a service definition and a container image to deploy.
Sample configuration files are available in the harnesscd-example-apps repository.
Add a service
- In the Service tab, click + Add Service.
- Enter a Name. For example,
cloud-run-service. - Click Save.
Add Cloud Run service definition
- Click Add Manifest.
- Select Google Cloud Run Service Definition.
- Configure the following:
- Manifest Source: Git Repository.
- Git Connector: Select the Git connector you created in Platform setup.
Sample Cloud Run service definition:
apiVersion: serving.knative.dev/v1
kind: Service
metadata:
  name: <+service.name>
spec:
  template:
    spec:
      containers:
      - image: <+artifact.image>
        ports:
        - containerPort: 8080
        env:
        - name: ENV
          value: "production"
Add container image
- Click Add Primary Artifact.
- Select Google Artifact Registry or GCR.
- Configure the following:
- GCP Connector: Select the GCP connector you created in Platform setup.
- Project: Your GCP project ID.
- Image Path: Path to your container image.
- Tag: Select tag or use
<+input>.
- Click Continue to proceed to environment configuration.
Harness also supports Google Cloud Functions and GKE.
Define the Azure service by adding a function configuration and an artifact to deploy.
Sample configuration files are available in the harnesscd-example-apps repository.
Add a service
- In the Service tab, click + Add Service.
- Enter a Name. For example,
azure-function. - Click Save.
Add Azure function configuration
- Click Add Manifest.
- Select Azure Function App Configuration.
- Configure the following:
- Manifest Source: Git or Harness File Store.
- Git Connector: Select the Git connector you created in Platform setup (if using Git).
Sample application settings:
{
  "AzureWebJobsStorage": "<storage-connection-string>",
  "FUNCTIONS_WORKER_RUNTIME": "node",
  "FUNCTIONS_EXTENSION_VERSION": "~4"
}
Add function artifact
- Click Add Primary Artifact.
- Select an artifact source:
- Azure Artifacts: For packages.
- ACR: Select the ACR connector you created in Platform setup.
- Configure the connector and artifact details.
- Click Continue to proceed to environment configuration.
Harness also supports Azure Web Apps and AKS.
Define the Lambda service by adding a function definition and an artifact to deploy.
Sample configuration files are available in the harnesscd-example-apps repository.
Add a service
- In the Service tab, click + Add Service.
- Enter a Name. For example,
lambda-function. - Click Save.
Add Lambda function definition
- Click Add Manifest.
- Select AWS Lambda Function Definition.
- Configure the following:
- Manifest Source: Git or Harness File Store.
- Git Connector: Select the Git connector you created in Platform setup (if using Git).
- File Path: Path to your function definition JSON.
Sample Lambda Function Definition (view full example):
{
  "FunctionName": "hello-world-lambda",
  "Runtime": "python3.9",
  "Role": "arn:aws:iam::123456789012:role/lambda-execution-role",
  "Handler": "lambda_function.lambda_handler",
  "Code": {
    "S3Bucket": "<+artifact.bucketName>",
    "S3Key": "<+artifact.key>"
  },
  "Description": "Hello World Lambda function",
  "Timeout": 30,
  "MemorySize": 128,
  "Publish": true
}
Replace the Role ARN with your actual Lambda execution role ARN.
Add Lambda artifact
-
Click Add Primary Artifact.
-
Select Amazon S3.
-
Configure the following:
- AWS Connector: Select the AWS connector you created in Platform setup.
- Region:
us-east-1(or your region). - Bucket: Your S3 bucket name (where you uploaded the ZIP in Platform setup).
- File Path:
hello-world.zip(the file you uploaded).
Sample artifact: hello-world.zip
-
Click Continue to proceed to environment configuration.
Harness also supports ECS, SAM, and other AWS services.
Step 4: Configure environment and infrastructure
Perform the following steps to define where you are deploying (the environment) and the specific infrastructure details:
Select your deployment platform from the following:
- Kubernetes
- SSH / Traditional
- Google Cloud Run
- Azure
- AWS Lambda
Create an environment to represent your deployment target, then define the Kubernetes infrastructure to deploy to.
Create environment
- Click + New Environment.
- Configure the following:
- Name:
dev-environment. - Environment Type: Pre-Production.
- Name:
- Click Save.
Define infrastructure
-
Click + Select Infrastructure.
-
Provide Name:
k8s-dev-cluster. -
Configure the following:
- Connector: Select the Kubernetes cluster connector you created in Platform setup.
- Namespace: Enter target namespace (e.g.,
default,dev,production). - Release Name:
release-<+INFRA_KEY>(for deployment tracking).
-
Click Continue to proceed to Execution.
Go to Kubernetes infrastructure for advanced configuration options.
Create an environment to represent your deployment target, then define the target hosts to deploy to over SSH.
Create environment
- Click + New Environment.
- Configure the following:
- Name:
production-servers. - Environment Type: Production.
- Name:
- Click Save.
Define infrastructure
- Click + Select Infrastructure.
- Provide Name:
prod-vms. - Configure the following:
- For a static host list:
- Connector: Select the SSH connector you created in Platform setup.
- Hosts: Add target host IPs or hostnames (e.g.,
192.168.1.10,server1.example.com). - Host Attributes: Add tags for organization (optional).
- For dynamic infrastructure:
- Cloud Provider: Select the AWS, Azure, or GCP connector from Platform setup.
- Region: Select a region.
- Tags: Define filters to dynamically select instances.
- For a static host list:
- Click Continue to proceed to Execution.
Go to SSH infrastructure for configuration details.
Create an environment to represent your deployment target, then define the Google Cloud infrastructure to deploy to.
Create environment
- Click + New Environment.
- Configure the following:
- Name:
gcp-production. - Environment Type: Production.
- Name:
- Click Save.
Define infrastructure
-
Click + Select Infrastructure.
-
Provide Name:
cloud-run-infra. -
Configure the following:
- GCP Connector: Select the GCP connector you created in Platform setup.
- Project: Your GCP project ID (e.g.,
my-project-123456). - Region: Select region (e.g.,
us-central1,us-east1).
-
Click Continue to proceed to Execution.
Go to Cloud Run infrastructure for configuration details.
Create an environment to represent your deployment target, then define the Azure infrastructure to deploy to.
Create environment
- Click + New Environment.
- Configure the following:
- Name:
azure-prod. - Environment Type: Production.
- Name:
- Click Save.
Define infrastructure
-
Click + Select Infrastructure.
-
Provide Name:
azure-func-infra. -
Configure the following:
- Azure Connector: Select the Azure connector you created in Platform setup.
- Subscription: Select your Azure subscription ID.
- Resource Group: Your resource group name (e.g.,
my-function-rg). - Function App Name: Your function app name (the one you created in Azure Portal).
-
Click Continue to proceed to Execution.
Go to Azure Functions infrastructure for configuration details.
Create an environment to represent your deployment target, then define the AWS infrastructure to deploy to.
Create environment
- Click + New Environment.
- Configure the following:
- Name:
aws-lambda-prod. - Environment Type: Production.
- Name:
- Click Save.
Define infrastructure
-
Click + Select Infrastructure.
-
Provide Name:
lambda-infra. -
Configure the following:
- AWS Connector: Select the AWS connector you created in Platform setup.
- Region: Select your AWS region (e.g.,
us-east-1,us-west-2).
-
Click Continue to proceed to Execution.
Go to Lambda infrastructure for configuration details.
Step 5: Configure execution strategy
Different deployment types support different execution strategies. Select your deployment platform to view the available strategies:
- Kubernetes
- SSH / Traditional
- Google Cloud
- Azure
- AWS Lambda
Perform the following steps to configure the execution strategy for your Kubernetes deployment:
-
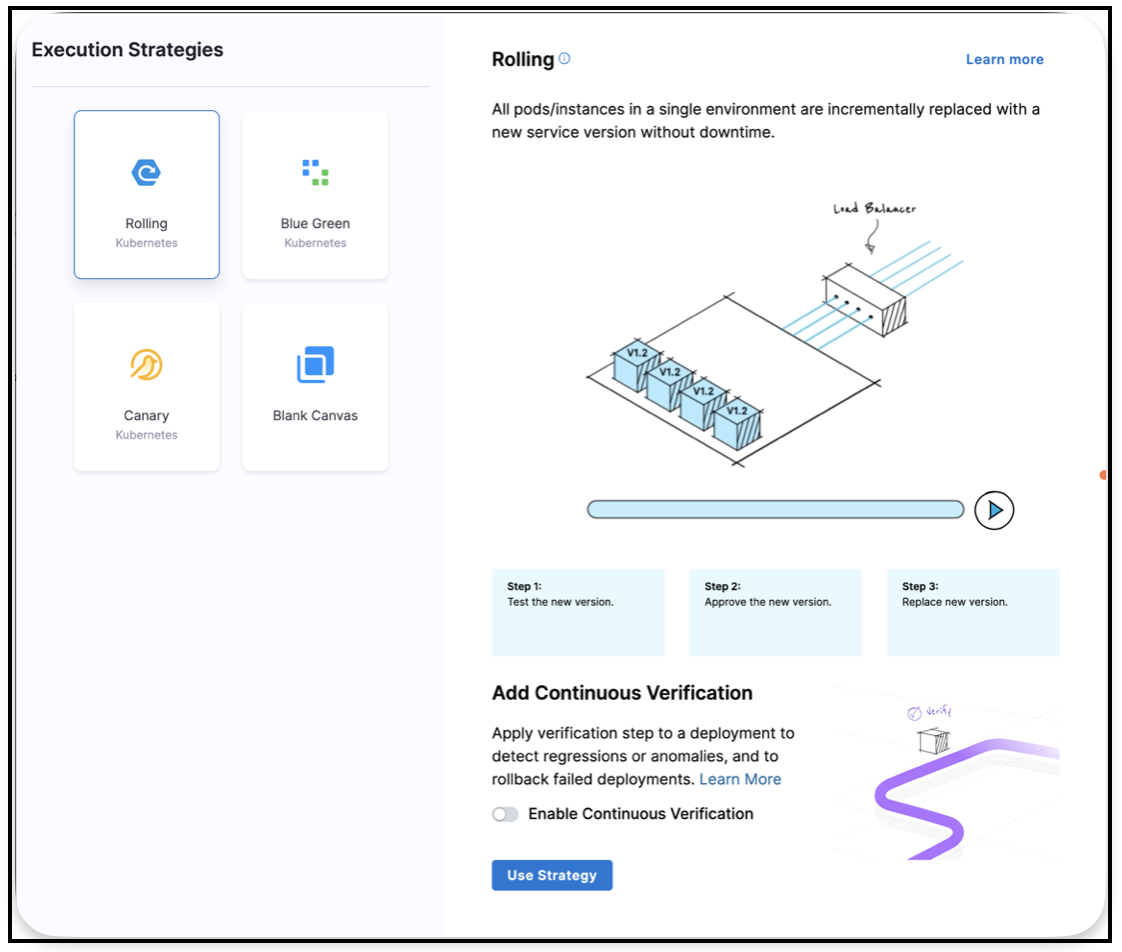
In the Execution tab, Harness automatically adds a Rollout Deployment step.
-
Click on the step to choose your execution strategy:
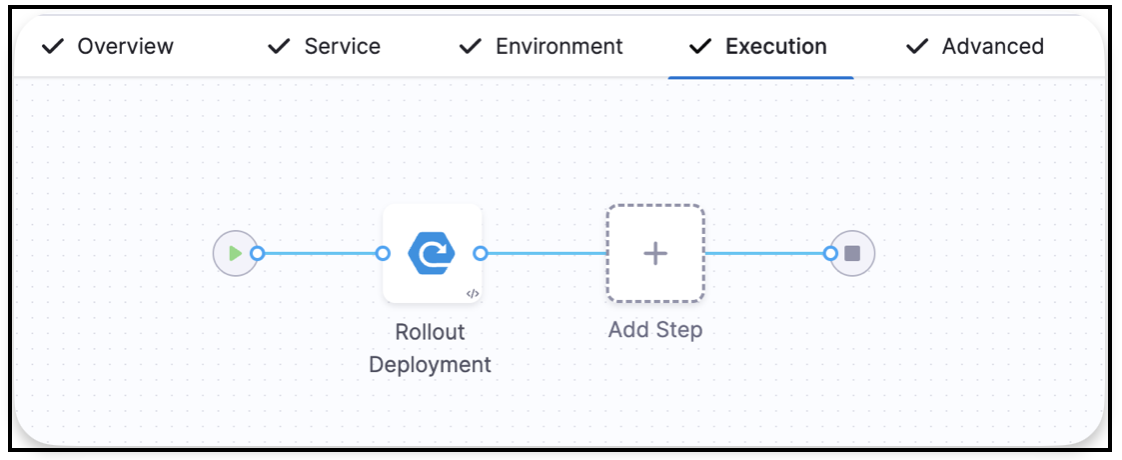
Available strategies for Kubernetes:
- Rolling: Incrementally updates pods with zero downtime. Supports all Kubernetes workloads (Deployment, DaemonSet, and so on).
- Blue Green: Deploys new version alongside old, then switches traffic instantly. Supports Deployment workloads only.
- Canary: Gradually routes traffic to new version in phases. Supports Deployment workloads only.
- Blank Canvas: Start with empty execution for custom workflows.
-
Select your strategy and click Use Strategy.
For more details on Kubernetes deployment strategies, go to What Can I Deploy in Kubernetes?.
Perform the following steps to configure the execution strategy for your SSH deployment:
-
In the Execution tab, Harness automatically adds deployment steps.
Available strategy:
- Rolling: Deploys to target hosts incrementally, either all at once or in phases. You can specify:
- Number of instances to deploy simultaneously.
- Percentage-based deployment phases.
- Custom deployment patterns.
The Rolling strategy is ideal for traditional deployments as it:
- Maintains service availability during deployment.
- Allows for gradual rollout verification.
- Supports easy rollback if issues are detected.
- Rolling: Deploys to target hosts incrementally, either all at once or in phases. You can specify:
-
Click Save to save your pipeline.
For more details on SSH deployments, go to SSH deployments.
Perform the following steps to configure the execution strategy for your Cloud Run deployment:
-
In the Execution tab, select your deployment strategy.
Available strategies for Cloud Run:
- Basic: Deploys new revision and routes 100% of traffic immediately.
- Steps: Download Manifest > Prepare Rollback > Deploy.
- Canary: Gradually shifts traffic from old to new revision.
- Steps: Download Manifest > Prepare Rollback > Deploy > Traffic Shift.
For Google Cloud Functions (2nd gen):
- Basic: Deploys new function version and routes 100% traffic.
- Canary: Gradually routes traffic to new version.
- Blue Green: Deploys new version and switches traffic at once.
For Google Cloud Functions (1st gen):
- Basic only: Deploys new function and terminates the old one.
- Basic: Deploys new revision and routes 100% of traffic immediately.
-
Select your strategy and Harness will automatically add the required steps.
-
Click Save to save your pipeline.
For more details, go to Google Cloud Functions and Google Cloud Run.
Perform the following steps to configure the execution strategy for your Azure deployment:
-
In the Execution tab, select your deployment strategy.
Available strategies for Azure Web Apps:
- Basic: Deploys to target slot without traffic shifting.
- Step: Slot Deployment.
- Canary: Shifts traffic from production to deployment slot incrementally.
- Steps: Slot Deployment > Traffic Shift (incremental) > Swap Slot.
- Blue Green: Deploys to deployment slot, then swaps all traffic at once.
- Steps: Slot Deployment > Swap Slot.
For Azure Functions:
- Basic: Deploys new function version.
- Custom: Define your own deployment workflow.
- Basic: Deploys to target slot without traffic shifting.
-
Select your strategy and Harness will automatically add the required steps.
-
Click Save to save your pipeline.
Azure Web Apps use slots for staging and production environments. Rolling strategy is not supported as it does not suit the slot-based deployment model. For more details, go to Azure Web Apps and Azure Functions.
Perform the following steps to configure the execution strategy for your Lambda deployment:
-
In the Execution tab, select your deployment strategy.
Available strategies for Lambda:
- Basic: Deploys new function version and routes 100% traffic immediately.
- Steps: AWS Lambda Deploy > AWS Lambda Rollback (for rollback).
- Canary: Gradually shifts traffic to new version using AWS Lambda's traffic shifting.
- Steps: Lambda Canary Deploy > Traffic Shift (for example, 10%) > Traffic Shift (100%) > Canary Rollback.
Canary deployment details:
- Deploy new version without shifting traffic initially.
- Incrementally route traffic (for example, 10%, then 100%).
- Add approval steps between traffic shifts to validate deployment health.
- Automatic rollback if failure detected.
- Basic: Deploys new function version and routes 100% traffic immediately.
-
Select your strategy and Harness will automatically add the required steps.
-
Click Save to save your pipeline.
For more details, go to AWS Lambda Deployments.
Enable Continuous Verification (optional)
You can enable Continuous Verification to automatically monitor your application's health after deployment.
Perform the following steps to enable Continuous Verification:
- Toggle Enable Continuous Verification.
- Configure your monitoring tools, such as Application Performance Monitoring (APM), logging, and metrics.
Go to the Continuous Verification documentation to learn about verification.
Step 6: Run your pipeline
After completing all configuration steps, perform the following steps to execute your deployment:
- Ensure your pipeline is saved. Click Save if needed.
- In the Pipeline Editor, click Run in the top right corner.
- Provide any required runtime inputs:
- Artifact versions or tags
- Environment variables
- Infrastructure parameters
- Click Run Pipeline to begin execution.
Harness executes your deployment and displays real-time progress, logs, and status for each step.
For detailed information on monitoring execution, viewing logs, troubleshooting failures, and understanding deployment status, go to the Pipeline Execution Walkthrough.
Next steps
Now that you have completed your first deployment, continue your Harness CD journey with the following:
- Browse all CD tutorials: Step-by-step guides for every deployment type.
- Harness CD example apps repository: Ready-to-use sample applications for Kubernetes, Helm, AWS Lambda, Azure Functions, Google Cloud Run, and more.
- Variables and expressions: Use variables for dynamic pipeline configuration.
- Pipeline triggers: Automate deployments based on events.
- Continuous Verification: Add automated deployment verification.
- Approval steps: Add manual or automated approvals.
The harnesscd-example-apps repository contains complete working examples with manifests, configurations, and artifacts that you can fork and use in your own pipelines.

For an interactive onboarding experience with advanced features like canary deployments, blue-green strategies, and automated rollbacks, go to Harness CD self-paced training.