Deploy using Helm Chart
This topic explains how to deploy a sample application (Guestbook) using a publicly available Helm chart with Harness Continuous Delivery (CD).
Harness CD offers two ways to deploy the Guestbook application:
- CD Pipeline: You build a Harness pipeline that deploys the Helm chart to your target cluster.
- GitOps workflow: You install a Harness GitOps Agent, connect it to your Git repo and target cluster, and let Harness (using Argo CD) sync the desired state from Git into your cluster.
Sign up today to get started with Harness CD.
What will you learn in this topic?
- How to set up a delegate, secret, connectors, environment, service, and pipeline to deploy the Guestbook application.
- How to choose a rolling, canary, or Blue Green deployment strategy for your pipeline.
- How to install a Harness GitOps Agent and sync the desired state from your Git repository into your cluster using Argo CD.
- How to deploy the Guestbook application using the Harness UI or CLI.
Before you begin
Ensure you have the following:
- GitHub personal access token: A token with the
reposcope. Go to creating a personal access token to generate one. - Kubernetes cluster: Use your own cluster, or install K3D to run Harness Delegates and the sample application in a local development environment. Go to Delegate system and network requirements to review the requirements.
- Helm CLI: Install the Helm CLI to install the Harness Helm delegate.
- Forked example repository: Fork the harnesscd-example-apps repository through the GitHub web interface. Go to GitHub docs to fork a repository.
- Harness API token (CLI method only): A token required to run the CLI steps. Go to creating a personal API token to generate one.
Deploy the application
Harness resources such as delegates, secrets, and connectors can be created at the Account, Organization, or Project scope. For simplicity, this tutorial uses Project-scoped resources throughout. If you use resources from a different scope, update the configuration accordingly when you create connectors, environments, services, and the deployment pipeline.
Go to Organizations and projects to understand the Harness resource hierarchy and scopes.
You can deploy the Guestbook application using either a Harness CD pipeline or a Harness GitOps workflow.
Run the following command to check your system resources and optionally install a local cluster:
bash <(curl -fsSL https://raw.githubusercontent.com/harness-community/scripts/main/delegate-preflight-checks/cluster-preflight-checks.sh)
- CD Pipeline
- GitOps Workflow
Deploy with a CD pipeline
Harness CD pipelines allow you to orchestrate and automate your deployment workflows and push updated application images to your target Kubernetes cluster. Pipelines allow extensive control over how you want to progress artifacts through various development, test, staging, or production clusters, when running a variety of scans and tests to ensure the quality and stability standards you and your team have defined.
You can proceed with the tutorial using either the Harness user interface (UI) or the command-line interface (CLI).
- UI
- CLI
Perform the following steps to deploy the Guestbook application using Harness CD Pipeline UI:
- Log in to Harness Manager.
- Select Projects, and then select Default Project.
- After selecting the project, configure the core resources Harness requires to run a deployment, including a delegate, a secret, two connectors, an environment, a service, and a deployment pipeline, as explained in the following sections.
For the pipeline to run successfully, follow the remaining steps as they are, including the naming conventions.
Delegate
The Harness Delegate is a service that runs in your local network or VPC to establish connections between the Harness Manager and various providers such as artifacts registries, cloud platforms, and so on. The delegate is installed in the target infrastructure, for example, a Kubernetes cluster, and performs operations including deployment and integration. Go to Delegate Overview to understand the delegate.
Perform the following steps to set up a delegate:
-
Under Project Settings, select Delegates.
-
Click New Delegate.
-
Select Kubernetes in the Select where you want to install your Delegate section.
-
In the Install your Delegate section, for this tutorial, install the delegate using Helm Chart.
-
Add the Harness Helm chart repo to your local helm registry using the following command.
helm repo add harness-delegate https://app.harness.io/storage/harness-download/delegate-helm-chart/ -
Update the repo using the following command:
helm repo update harness-delegate -
Copy and run the install command from the Delegate installation wizard as shown in the following example:
Here, the
ACCOUNT_ID,MANAGER_ENDPOINTandDELEGATE_TOKENare auto-populated values you will get from the wizard itself.helm upgrade -i helm-delegate --namespace harness-delegate-ng --create-namespace \harness-delegate/harness-delegate-ng \--set delegateName=helm-delegate \--set accountId=ACCOUNT_ID \--set managerEndpoint=MANAGER_ENDPOINT \--set delegateDockerImage=harness/delegate:23.03.78904 \--set replicas=1 --set upgrader.enabled=false \--set delegateToken=DELEGATE_TOKEN -
Select Verify to verify that the delegate is installed successfully and can connect to the Harness Manager.
You can also follow the Install Harness Delegate on Kubernetes or Docker steps to install the delegate using the Harness Terraform Provider or a Kubernetes manifest.
Secrets
Harness offers built-in secret management for encrypted storage of sensitive information. Secrets are decrypted when needed, and only the private network-connected Harness Delegate has access to the key management system. You can also integrate your own secret manager. Go to Harness Secret Manager Overview to understand secrets in Harness.
Perform the following steps to add a secret:
- Under Project Settings, select Secrets.
- Click New Secret, and then select Text.
- In the Add new Encrypted Text page,
- Select the Secret Manager. For example,
Harness Built-in Secret Manager. - Enter the Secret Name. For example,
harness_gitpat. - For the Secret Value, paste the GitHub personal access token you saved earlier.
- Add the Description (Optional) and Tags (Optional).
- Select Save.
- Select the Secret Manager. For example,
Connectors
Connectors in Harness enable integration with third party tools, providing authentication and operations during pipeline runtime. For instance, a GitHub connector facilitates authentication and fetching files from a GitHub repository within pipeline stages. Go to Connectors to explore connector how-tos.
Set up the GitHub connector
Perform the following steps to set up a GitHub connector:
- In your Harness project, under Project Settings, select Connectors.
- Select Create via YAML Builder and copy the contents of github-connector.yml into the YAML editor.
- Replace
GITHUB_USERNAMEwith your GitHub account username in the YAML (assuming you have already forked the harnesscd-example-apps repo as noted in Before you begin). - In
projectIdentifier, verify that the project identifier is correct. You can see the Id in the browser URL (afteraccount). If it is incorrect, the Harness YAML editor suggests the correct Id. - Select Save Changes and verify that the new connector named
harness_gitconnectoris successfully created. - Select Connection Test under Connectivity Status to ensure the connection is successful.
Set up the Kubernetes connector
Perform the following steps to set up a Kubernetes connector:
- In your Harness project, under Project Settings, select Connectors.
- Select Create via YAML Builder and copy the contents of kubernetes-connector.yml into the YAML editor.
- Replace
DELEGATE_NAMEwith the installed Delegate name. To obtain the Delegate name, navigate to Project Settings, and then Delegates. - Select Save Changes and verify that the new connector named
harness_k8sconnectoris successfully created. - Select Connection Test under Connectivity Status to verify the connection is successful.
Deployment strategies
Helm is primarily focused on managing the release and versioning of application packages. Helm supports rollback through its release management features. When you deploy an application using Helm, it creates a release that represents a specific version of the application with a unique release name.
Harness performs canary and blue-green deployments with Helm as follows:
- Harness integrates with Helm by using Helm charts and releases. Helm charts define the application package and its dependencies, and Helm releases represent specific versions of the application.
- Harness allows you to define the application configuration, including Helm charts, values files, and any custom configurations required for your application.
- In Harness, you can specify the percentage of traffic to route to the new version in a canary deployment or define the conditions to switch traffic between the blue and green environments in a blue-green deployment.
- Harness orchestrates the deployment workflow, including the deployment of Helm charts, by interacting with the Helm API. It manages the release lifecycle, tracks revisions, and controls the rollout process based on the defined canary or blue-green strategy.
Harness adds an additional layer of functionality on top of Helm, providing an automated approach to canary and blue-green deployments. By using Helm's package management capabilities and integrating with its release management features, Harness extends Helm to support canary and blue-green deployment strategies.
Pick a deployment strategy from the following:
- Canary
- Blue Green
- K8s Rolling
- Native Helm Rolling
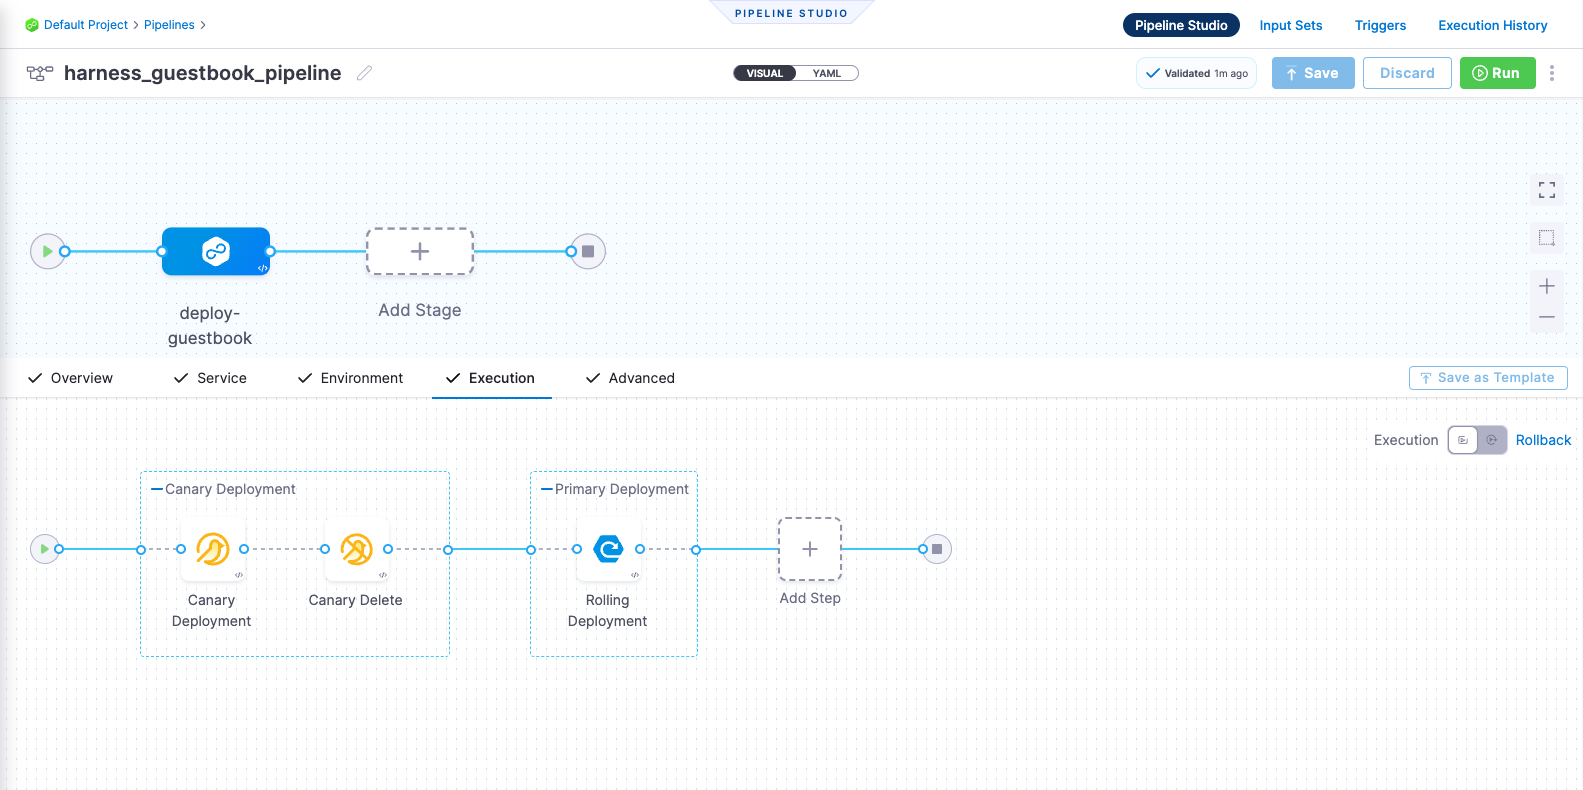
A canary deployment updates nodes in a single environment gradually, allowing you to use gates between increments. Canary deployments allow incremental updates and ensure a controlled rollout process. Go to When to use Canary deployments to understand when to use them.
Environment
Environments define the deployment location, categorized as Production or Pre-Production. Each environment includes infrastructure definitions for VMs, Kubernetes clusters, or other target infrastructures. Go to Environments overview to understand environments.
Perform the following steps to set up an environment:
- In Default Project, select Environments.
- Select New Environment and toggle to the YAML view.
- Copy the contents of k8s-environment.yml, paste it into the YAML editor, and then select Save.
- In the Infrastructure Definitions tab, select Infrastructure Definition, and then select Edit YAML.
- Copy the contents of k8s-infrastructure-definition.yml and paste it into the YAML editor.
- Select Save and verify that the environment and infrastructure definition are created successfully.
Service
In Harness, services represent what you deploy to an environment. You use services to configure variables, manifests, and artifacts. The Services dashboard provides service statistics such as deployment frequency and failure rate. Go to Services overview to understand services.
Perform the following steps to set up a service:
- In Default Project, select Services.
- Select New Service, enter the name
harnessguestbookdep, and then select Save. - On the Configuration tab, toggle to the YAML view, and then select Edit YAML.
- Copy the contents of k8s-service.yml and paste it into the YAML editor.
- Select Save and verify that the service
harness_guestbookis successfully created.
Pipeline
A pipeline is a comprehensive process encompassing integration, delivery, operations, testing, deployment, and monitoring. It can use CI for code building and testing, followed by CD for artifact deployment in production. A CD Pipeline is a series of stages where each stage deploys a service to an environment. Go to CD pipeline basics to understand CD pipelines.
Perform the following steps to set up a pipeline with canary deployment:
- In Default Project, select Pipelines.
- Select New Pipeline.
- Enter the name
guestbook_canary_pipeline. - Select Inline to store the pipeline in Harness.
- Select Start and, in the Pipeline Studio, toggle to YAML to use the YAML editor.
- Select Edit YAML to enable edit mode, copy the contents of k8s-canary-pipeline.yml, and paste it into the YAML editor.
- Select Save.
You can switch to the Visual pipeline editor and confirm the pipeline stage and execution steps as shown below.
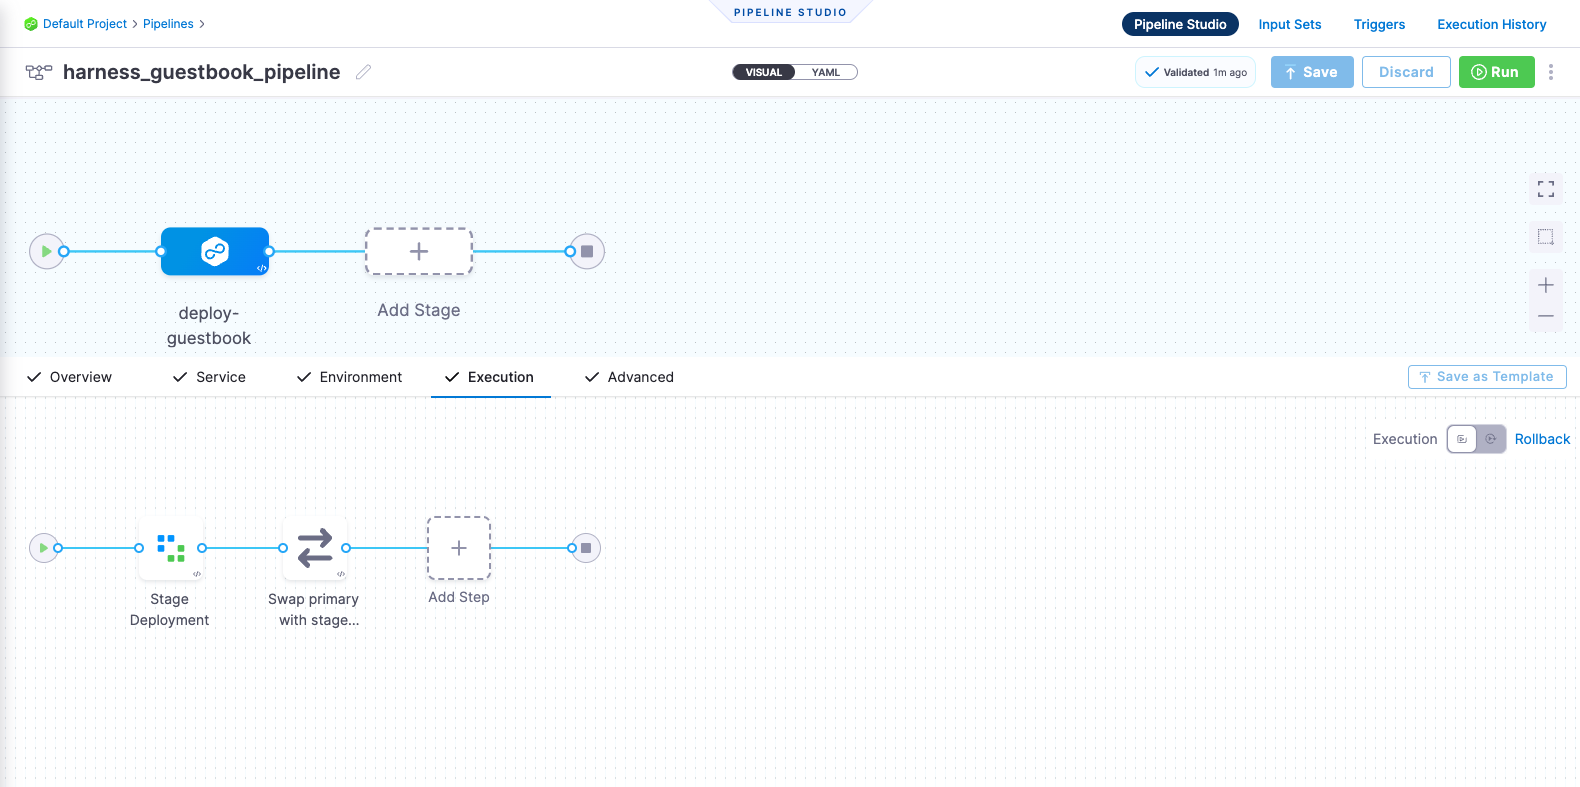
Blue Green deployments involve running two identical environments (staging and production) simultaneously with different service versions. QA and UAT are performed on a new service version in the staging environment first. Next, traffic is shifted from the production environment to staging, and the previous service version running on production is scaled down. Blue Green deployments are also referred to as red/black deployment by some vendors. Go to When to use Blue Green deployments to understand when to use them.
Environment
Environments define the deployment location, categorized as Production or Pre-Production. Each environment includes infrastructure definitions for VMs, Kubernetes clusters, or other target infrastructures. Go to Environments overview to understand environments.
Perform the following steps to set up an environment:
- In Default Project, select Environments.
- Select New Environment and toggle to the YAML view.
- Copy the contents of k8s-environment.yml, paste it into the YAML editor, and then select Save.
- In the Infrastructure Definitions tab, select Infrastructure Definition, and then select Edit YAML.
- Copy the contents of k8s-infrastructure-definition.yml and paste it into the YAML editor.
- Select Save and verify that the environment and infrastructure definition are created successfully.
Service
In Harness, services represent what you deploy to an environment. You use services to configure variables, manifests, and artifacts. The Services dashboard provides service statistics such as deployment frequency and failure rate. Go to Services overview to understand services.
Perform the following steps to set up a service:
- In Default Project, select Services.
- Select New Service, enter the name
harnessguestbookdep, and then select Save. - On the Configuration tab, toggle to the YAML view, and then select Edit YAML.
- Copy the contents of k8s-service.yml and paste it into the YAML editor.
- Select Save and verify that the service
harness_guestbookis successfully created.
Pipeline
A pipeline is a comprehensive process encompassing integration, delivery, operations, testing, deployment, and monitoring. It can use CI for code building and testing, followed by CD for artifact deployment in production. A CD Pipeline is a series of stages where each stage deploys a service to an environment. Go to CD pipeline basics to understand CD pipelines.
Perform the following steps to set up a pipeline with Blue Green deployment:
- In Default Project, select Pipelines.
- Select New Pipeline.
- Enter the name
guestbook_bluegreen_pipeline. - Select Inline to store the pipeline in Harness.
- Select Start and, in the Pipeline Studio, toggle to YAML to use the YAML editor.
- Select Edit YAML to enable edit mode, copy the contents of k8s-bluegreen-pipeline.yml, and paste it into the YAML editor.
- Select Save.
You can switch to the Visual pipeline editor and confirm the pipeline stage and execution steps as shown below.
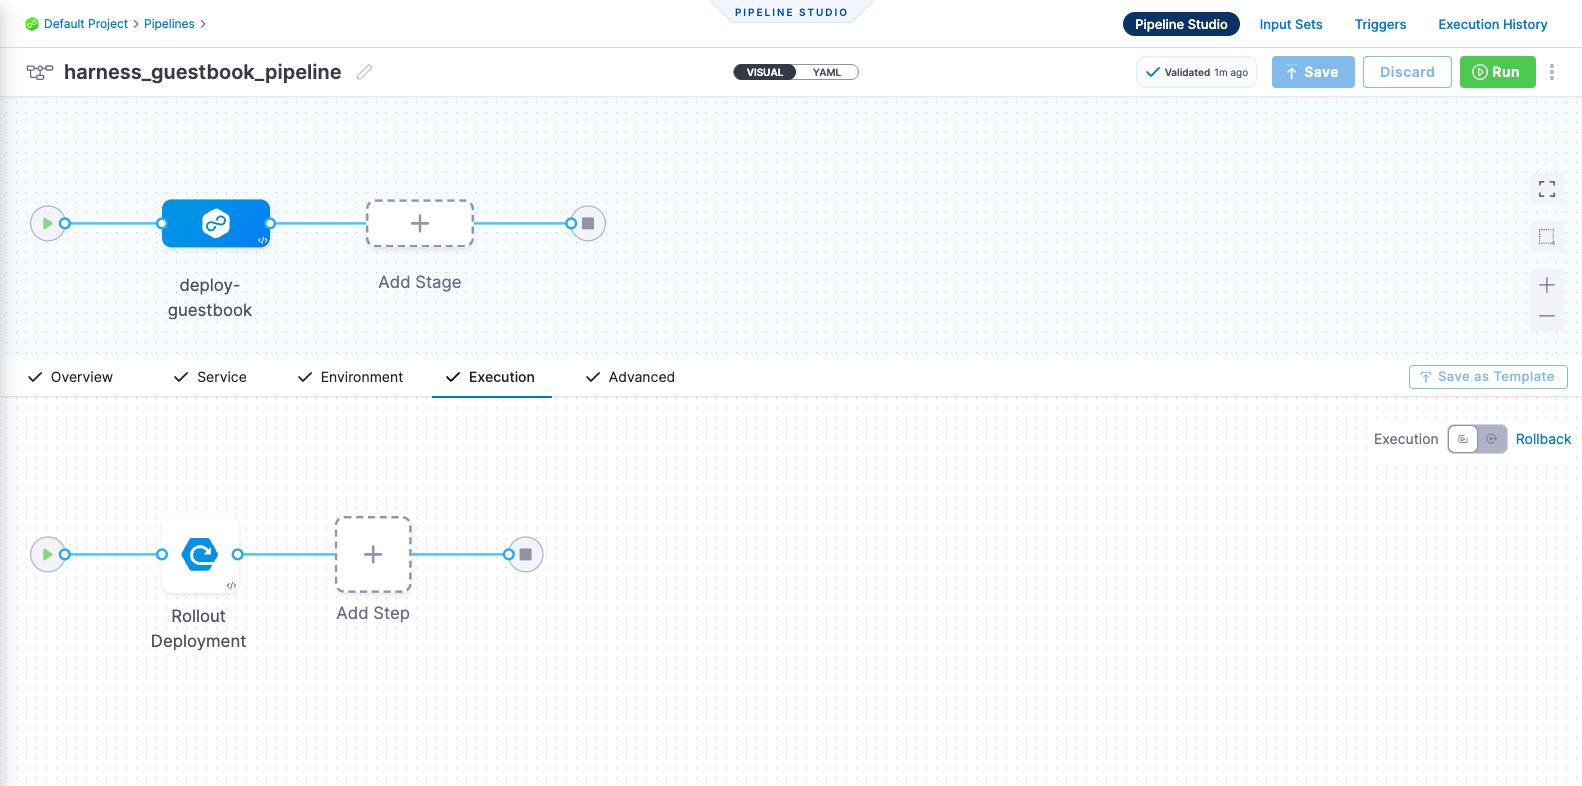
Rolling deployments incrementally add nodes in a single environment with a new service version, either one-by-one or in batches defined by a window size. Rolling deployments allow a controlled and gradual update process for the new service version. Go to When to use rolling deployments to understand when to use them.
Environment
Environments define the deployment location, categorized as Production or Pre-Production. Each environment includes infrastructure definitions for VMs, Kubernetes clusters, or other target infrastructures. Go to Environments overview to understand environments.
Perform the following steps to set up an environment:
- In Default Project, select Environments.
- Select New Environment and toggle to the YAML view.
- Copy the contents of k8s-environment.yml, paste it into the YAML editor, and then select Save.
- On the Infrastructure Definitions tab, select Infrastructure Definition, and then select Edit YAML.
- Copy the contents of k8s-infrastructure-definition.yml and paste it into the YAML editor.
- Select Save and verify that the environment and infrastructure definition are created successfully.
Service
In Harness, services represent what you deploy to an environment. You use services to configure variables, manifests, and artifacts. The Services dashboard provides service statistics such as deployment frequency and failure rate. Go to Services overview to understand services.
Perform the following steps to set up a service:
- In Default Project, select Services.
- Select New Service, enter the name
harnessguestbookdep, and then select Save. - On the Configuration tab, toggle to the YAML view, and then select Edit YAML.
- Copy the contents of k8s-service.yml and paste it into the YAML editor.
- Select Save and verify that the service
harness_guestbookis successfully created.
Pipeline
A pipeline is a comprehensive process encompassing integration, delivery, operations, testing, deployment, and monitoring. It can use CI for code building and testing, followed by CD for artifact deployment in production. A CD Pipeline is a series of stages where each stage deploys a service to an environment. Go to CD pipeline basics to understand CD pipelines.
Perform the following steps to set up a pipeline with Kubernetes rolling deployment:
- In Default Project, select Pipelines.
- Select New Pipeline.
- Enter the name
guestbook_k8s_rolling_pipeline. - Select Inline to store the pipeline in Harness.
- Select Start and, in the Pipeline Studio, toggle to YAML to use the YAML editor.
- Select Edit YAML to enable edit mode, copy the contents of k8s-rolling-pipeline.yml, and paste it into the YAML editor.
- Select Save.
You can switch to the Visual pipeline editor and confirm the pipeline stage and execution steps as shown below.
Rolling deployments incrementally add nodes in a single environment with a new service version, either one-by-one or in batches defined by a window size. Rolling deployments allow a controlled and gradual update process for the new service version. Go to When to use rolling deployments to understand when to use them.
Environment
Environments define the deployment location, categorized as Production or Pre-Production. Each environment includes infrastructure definitions for VMs, Kubernetes clusters, or other target infrastructures. Go to Environments overview to understand environments.
Perform the following steps to set up an environment:
- In Default Project, select Environments.
- Select New Environment and toggle to the YAML view.
- Copy the contents of nativehelm-environment.yml, paste it into the YAML editor, and then select Save.
- In the Infrastructure Definitions tab, select Infrastructure Definition, and then select Edit YAML.
- Copy the contents of nativehelm-infrastructure-definition.yml and paste it into the YAML editor.
- Select Save and verify that the environment and infrastructure definition are created successfully.
Service
In Harness, services represent what you deploy to an environment. You use services to configure variables, manifests, and artifacts. The Services dashboard provides service statistics such as deployment frequency and failure rate. Go to Services overview to understand services.
Perform the following steps to set up a service:
- In Default Project, select Services.
- Select New Service, enter the name
harnessguestbook, and then select Save. - On the Configuration tab, toggle to the YAML view, and then select Edit YAML.
- Copy the contents of nativehelm-service.yml and paste it into the YAML editor.
- Select Save and verify that the service
harness_guestbookis successfully created.
Pipeline
A pipeline is a comprehensive process encompassing integration, delivery, operations, testing, deployment, and monitoring. It can use CI for code building and testing, followed by CD for artifact deployment in production. A CD Pipeline is a series of stages where each stage deploys a service to an environment. Go to CD pipeline basics to understand CD pipelines.
Perform the following steps to set up a pipeline with Native Helm rolling deployment:
- In Default Project, select Pipelines.
- Select New Pipeline.
- Enter the name
guestbook_rolling_pipeline. - Select Inline to store the pipeline in Harness.
- Select Start and, in the Pipeline Studio, toggle to YAML to use the YAML editor.
- Select Edit YAML to enable edit mode, copy the contents of nativehelm-rolling-pipeline.yml, and paste it into the YAML editor.
- Select Save.
You can switch to the Visual pipeline editor and confirm the pipeline stage and execution steps as shown below.
Perform the following steps to install and access Harness CLI:
- Download and configure the Harness CLI.
- MacOS
- Linux
- Windows
curl -LO https://github.com/harness/harness-cli/releases/download/v0.0.25-Preview/harness-v0.0.25-Preview-darwin-amd64.tar.gz
tar -xvf harness-v0.0.25-Preview-darwin-amd64.tar.gz
export PATH="$(pwd):$PATH"
echo 'export PATH="'$(pwd)':$PATH"' >> ~/.bash_profile
source ~/.bash_profile
harness --version
- ARM
- AMD
curl -LO https://github.com/harness/harness-cli/releases/download/v0.0.25-Preview/harness-v0.0.25-Preview-linux-arm64.tar.gz
tar -xvf harness-v0.0.25-Preview-linux-arm64.tar.gz
curl -LO https://github.com/harness/harness-cli/releases/download/v0.0.25-Preview/harness-v0.0.25-Preview-linux-amd64.tar.gz
tar -xvf harness-v0.0.25-Preview-linux-amd64.tar.gz
a. Open Windows Powershell and run the following command to download the Harness CLI:
Invoke-WebRequest -Uri https://github.com/harness/harness-cli/releases/download/v0.0.25-Preview/harness-v0.0.25-Preview-windows-amd64.zip -OutFile ./harness.zip
b. Extract the downloaded zip file and change directory to extracted file location.
c. Perform the steps below to make it accessible via terminal.
$currentPath = Get-Location
[Environment]::SetEnvironmentVariable("PATH", "$env:PATH;$currentPath", [EnvironmentVariableTarget]::Machine)
d. Restart terminal.
-
Clone the Forked
harnesscd-example-appsrepo and change directory.git clone https://github.com/GITHUB_ACCOUNTNAME/harnesscd-example-apps.gitcd harnesscd-example-appsnoteReplace
GITHUB_ACCOUNTNAMEwith your GitHub Account name. -
Log in to Harness from the CLI.
harness login --account-id ACCOUNT_ID --api-key HARNESS_API_TOKENnoteReplace
HARNESS_API_TOKENwith Harness API Token that you obtained in Before you begin section of this tutorial. -
After logging in and selecting the project, configure the core resources Harness requires to run a deployment, including a delegate, a secret, two connectors, an environment, a service, and a deployment pipeline, as explained in the following sections.
For the pipeline to run successfully, follow all of the following steps as they are, including the naming conventions.
Delegate
The Harness Delegate is a service that runs in your local network or VPC to establish connections between the Harness Manager and various providers such as artifact registries, cloud platforms, etc. The delegate is installed in the target infrastructure (Kubernetes cluster) and performs operations including deployment and integration. Go to Delegate Overview to understand the delegate.
Perform the following steps to set up a delegate:
-
Under Project Settings, select Delegates.
-
Click New Delegate.
-
Select Kubernetes in the Select where you want to install your Delegate section.
-
In the Install your Delegate section, for this tutorial, install the delegate using Helm Chart.
-
Add the Harness Helm chart repo to your local helm registry using the following command.
helm repo add harness-delegate https://app.harness.io/storage/harness-download/delegate-helm-chart/ -
Update the repo using the following command:
helm repo update harness-delegate -
Copy and run the install command from the Delegate installation wizard as shown in the following example:
Here, the
ACCOUNT_ID,MANAGER_ENDPOINTandDELEGATE_TOKENare auto-populated values you will get from the wizard itself.helm upgrade -i helm-delegate --namespace harness-delegate-ng --create-namespace \harness-delegate/harness-delegate-ng \--set delegateName=helm-delegate \--set accountId=ACCOUNT_ID \--set managerEndpoint=MANAGER_ENDPOINT \--set delegateDockerImage=harness/delegate:23.03.78904 \--set replicas=1 --set upgrader.enabled=false \--set delegateToken=DELEGATE_TOKEN -
Verify that the delegate is installed successfully and can connect to the Harness Manager.
You can also follow the Install Harness Delegate on Kubernetes or Docker steps to install the delegate using the Terraform Helm Provider or a Kubernetes manifest.
Secrets
Harness offers built-in secret management for encrypted storage of sensitive information. Secrets are decrypted when needed, and only the private network-connected Harness Delegate has access to the key management system. You can also integrate your own secret manager. Go to Harness Secret Manager Overview to understand secrets in Harness.
Create a text secret from the GitHub PAT you generated in the Before you begin section:
harness secret --token <YOUR GITHUB PAT>
Connectors
Connectors in Harness enable integration with third party tools, providing authentication and operations during pipeline runtime. For instance, a GitHub connector facilitates authentication and fetching files from a GitHub repository within pipeline stages. Go to Connectors to explore connector how-tos.
GitHub connector
Perform the following steps to set up a GitHub connector:
- Replace
GITHUB_USERNAMEwith your GitHub account username in thegithub-connector.yaml. - In
projectIdentifier, verify that the project identifier is correct. You can see the Id in the browser URL (afteraccount). If it is incorrect, the Harness YAML editor will suggest the correct Id. - Create the GitHub connector using the following CLI command:
harness connector --file "helm-guestbook/harnesscd-pipeline/github-connector.yml" apply --git-user <YOUR GITHUB USERNAME>
Kubernetes connector
Perform the following steps to set up a Kubernetes connector:
-
In
kubernetes-connector.yml, confirm the delegate name is set tohelm-delegate(the name used in the Delegate step earlier). -
Create the Kubernetes connector using the following CLI command:
harness connector --file "helm-guestbook/harnesscd-pipeline/kubernetes-connector.yml" apply --delegate-name helm-delegate
Deployment strategies
Helm is primarily focused on managing the release and versioning of application packages. Helm supports rollback through its release management features. When you deploy an application using Helm, it creates a release that represents a specific version of the application with a unique release name.
Harness performs canary and blue-green deployments with Helm as follows:
- Harness integrates with Helm by using Helm charts and releases. Helm charts define the application package and its dependencies, and Helm releases represent specific versions of the application.
- Harness allows you to define the application configuration, including Helm charts, values files, and any custom configurations required for your application.
- In Harness, you can specify the percentage of traffic to route to the new version in a canary deployment or define the conditions to switch traffic between the blue and green environments in a blue-green deployment.
- Harness orchestrates the deployment workflow, including the deployment of Helm charts, by interacting with the Helm API. It manages the release lifecycle, tracks revisions, and controls the rollout process based on the defined canary or blue-green strategy.
Harness adds an additional layer of functionality on top of Helm, providing an automated approach to canary and blue-green deployments. By using Helm's package management capabilities and integrating with its release management features, Harness extends Helm to support canary and blue-green deployment strategies.
Pick a deployment strategy from the following:
- Canary
- Blue Green
- K8s Rolling
- Native Helm Rolling
A canary deployment updates nodes in a single environment gradually, allowing you to use gates between increments. Canary deployments allow incremental updates and ensure a controlled rollout process. Go to When to use Canary deployments to understand when to use them.
Environment
Environments define the deployment location, categorized as Production or Pre-Production. Each environment includes infrastructure definitions for VMs, Kubernetes clusters, or other target infrastructures. Go to Environments overview to understand environments.
Perform the following steps to set up an environment:
-
Run the following CLI command to create Environments in your Harness project:
harness environment --file "helm-guestbook/harnesscd-pipeline/k8s-environment.yml" apply -
In your new environment, add Infrastructure Definitions using the following CLI command:
harness infrastructure --file "helm-guestbook/harnesscd-pipeline/k8s-infrastructure-definition.yml" apply
Service
In Harness, services represent what you deploy to environments. You use services to configure variables, manifests, and artifacts. The Services dashboard provides service statistics like deployment frequency and failure rate. Go to Services overview to understand services.
Run the following CLI command to create Services in your Harness project:
harness service -file "helm-guestbook/harnesscd-pipeline/k8s-service.yml" apply
Pipeline
A pipeline is a comprehensive process encompassing integration, delivery, operations, testing, deployment, and monitoring. It can use CI for code building and testing, followed by CD for artifact deployment in production. A CD Pipeline is a series of stages where each stage deploys a service to an environment. Go to CD pipeline basics to understand CD pipelines.
Run the following CLI command for canary deployment:
harness pipeline --file "helm-guestbook/harnesscd-pipeline/k8s-canary-pipeline.yml" apply
You can switch to the Visual editor and confirm the pipeline stage and execution steps as shown below.
Blue Green deployments involve running two identical environments (staging and production) simultaneously with different service versions. QA and UAT are performed on a new service version in the staging environment first. Next, traffic is shifted from the production environment to staging, and the previous service version running on production is scaled down. Blue Green deployments are also referred to as red/black deployment by some vendors. Go to When to use Blue Green deployments to understand when to use them.
Environment
Environments define the deployment location, categorized as Production or Pre-Production. Each environment includes infrastructure definitions for VMs, Kubernetes clusters, or other target infrastructures. Go to Environments overview to understand environments.
Perform the following steps to set up an environment:
-
Run the following CLI command to create Environments in your Harness project:
harness environment --file "helm-guestbook/harnesscd-pipeline/k8s-environment.yml" apply -
In your new environment, add Infrastructure Definitions using the following CLI command:
harness infrastructure --file "helm-guestbook/harnesscd-pipeline/k8s-infrastructure-definition.yml" apply
Service
In Harness, services represent what you deploy to environments. You use services to configure variables, manifests, and artifacts. The Services dashboard provides service statistics like deployment frequency and failure rate. Go to Services overview to understand services.
Run the following CLI command to create Services in your Harness project:
harness service -file "helm-guestbook/harnesscd-pipeline/k8s-service.yml" apply
Pipeline
A pipeline is a comprehensive process encompassing integration, delivery, operations, testing, deployment, and monitoring. It can use CI for code building and testing, followed by CD for artifact deployment in production. A CD Pipeline is a series of stages where each stage deploys a service to an environment. Go to CD pipeline basics to understand CD pipelines.
Run the following CLI command for blue-green deployment:
harness pipeline --file "helm-guestbook/harnesscd-pipeline/k8s-bluegreen-pipeline.yml" apply
You can switch to the Visual editor and confirm the pipeline stage and execution steps as shown below.
Rolling deployments incrementally add nodes with a new service version to a single environment, either one by one or in batches defined by a window size. Rolling deployments allow a controlled and gradual update process for the new service version. Go to When to use rolling deployments to understand when to use them.
Environment
Environments define the deployment location, categorized as Production or Pre-Production. Each environment includes infrastructure definitions for VMs, Kubernetes clusters, or other target infrastructures. Go to Environments overview to understand environments.
Perform the following steps to set up an environment:
-
Run the following CLI command to create Environments in your Harness project:
harness environment --file "helm-guestbook/harnesscd-pipeline/k8s-environment.yml" apply -
In your new environment, add Infrastructure Definitions using the following CLI command:
harness infrastructure --file "helm-guestbook/harnesscd-pipeline/k8s-infrastructure-definition.yml" apply
Service
In Harness, services represent what you deploy to environments. You use services to configure variables, manifests, and artifacts. The Services dashboard provides service statistics like deployment frequency and failure rate. Go to Services overview to understand services.
Run the following CLI command to create Services in your Harness project:
harness service -file "helm-guestbook/harnesscd-pipeline/k8s-service.yml" apply
Pipeline
A pipeline is a comprehensive process encompassing integration, delivery, operations, testing, deployment, and monitoring. It can use CI for code building and testing, followed by CD for artifact deployment in production. A CD Pipeline is a series of stages where each stage deploys a service to an environment. Go to CD pipeline basics to understand CD pipelines.
Run the following CLI command for Kubernetes rolling deployment:
harness pipeline --file "helm-guestbook/harnesscd-pipeline/k8s-rolling-pipeline.yml" apply
You can switch to the Visual editor and confirm the pipeline stage and execution steps as shown below.
Rolling deployments incrementally add nodes in a single environment with a new service version, either one-by-one or in batches defined by a window size. Rolling deployments allow a controlled and gradual update process for the new service version. Go to When to use rolling deployments to understand when to use them.
Environment
Environments define the deployment location, categorized as Production or Pre-Production. Each environment includes infrastructure definitions for VMs, Kubernetes clusters, or other target infrastructures. Go to Environments overview to understand environments.
Perform the following steps to set up an environment:
-
Run the following CLI command to create Environments in your Harness project:
harness environment --file "helm-guestbook/harnesscd-pipeline/nativehelm-environment.yml" apply -
In your new environment, add Infrastructure Definitions using the following CLI command:
harness infrastructure --file "helm-guestbook/harnesscd-pipeline/nativehelm-infrastructure-definition.yml" apply
Service
In Harness, services represent what you deploy to environments. You use services to configure variables, manifests, and artifacts. The Services dashboard provides service statistics like deployment frequency and failure rate. Go to Services overview to understand services.
Run the following CLI command to create Services in your Harness project:
harness service -file "helm-guestbook/harnesscd-pipeline/nativehelm-service.yml" apply
Pipeline
A pipeline is a comprehensive process encompassing integration, delivery, operations, testing, deployment, and monitoring. It can use CI for code building and testing, followed by CD for artifact deployment in production. A CD Pipeline is a series of stages where each stage deploys a service to an environment. Go to CD pipeline basics to understand CD pipelines.
Run the following CLI command for Native Helm rolling deployment:
harness pipeline --file "helm-guestbook/harnesscd-pipeline/nativehelm-rolling-pipeline.yml" apply
You can switch to the Visual editor and confirm the pipeline stage and execution steps as shown below.
Run the pipeline
Perform the following steps to execute the pipeline:
-
In the Pipeline Studio, select Run, and then select Run Pipeline to initiate the deployment.
-
Observe the execution logs as Harness deploys the workload and checks for steady state.
-
After a successful execution, you can check the deployment on your Kubernetes cluster using the following command:
kubectl get pods -n default -
To access the Guestbook application deployed using the Harness pipeline, port forward the service and access it at
http://localhost:8080:kubectl port-forward svc/<service-name> 8080:80
Deploy your own application
Follow these steps to deploy your own application using a Harness CD pipeline instead of the sample Guestbook application.
-
Use the same delegate that you deployed as part of this tutorial. Alternatively, deploy a new delegate, but remember to use a newly created delegate identifier when creating connectors.
-
If you intend to use a private Git repository that hosts your Helm chart, create a Harness secret containing the Git personal access token (PAT). Subsequently, create a new Git connector using this secret.
-
Create a Kubernetes connector if you plan to deploy your applications in a new Kubernetes environment. Ensure to update the infrastructure definition to reference this newly created Kubernetes connector.
-
Once you complete all the aforementioned steps, create a new Harness service that leverages the Helm chart for deploying applications.
-
Establish a new deployment pipeline and select the newly created infrastructure definition and service. Choose a deployment strategy that aligns with your microservice application's deployment needs.
Harness GitOps (built on top of Argo CD) watches the state of your application as defined in a Git repo, and can pull (either automatically or on demand) these changes into your Kubernetes cluster, leading to an application sync.
Harness GitOps supports Argo CD as the GitOps reconciler.
Whether you are new to GitOps or already have an Argo CD instance, this tutorial helps you get started with Harness GitOps, both with and without Argo CD.
Deploy with Harness GitOps
Perform the following steps to install the application using GitOps workflow:
- Log in to the Harness App.
- Select Projects in the top left corner of the UI, and then select Default Project.
- In Deployments, select GitOps.
- Set up a GitOps Agent (connects Harness to your cluster), a Repository (what to deploy), a Cluster (where to deploy it), and an Application (which ties the Agent, Repository, and Cluster) as explained in the following sections.
Install a Harness GitOps Agent
A Harness GitOps Agent is a worker process that runs in your environment, makes secure, outbound connections to Harness, and performs all the GitOps tasks you request in Harness.
Perform the following steps to set up a GitOps Agent:
- Select Settings on the top right corner of the UI.
- Select GitOps Agents, and then select New GitOps Agent.
- In Do you have any existing Argo CD instances?, select Yes if you already have an Argo CD instance, else select No to install the Harness GitOps Agent.
- (No is selected) Harness GitOps Agent Fresh Install
- (Yes is selected) Harness GitOps Agent with existing Argo CD instance
Perform the following steps:
- Select Start.
- In Name, enter the name for the new Agent.
- In Namespace, enter the namespace where you want to install the Harness GitOps Agent. Typically, this is the target namespace for your deployment. For this tutorial, use the
defaultnamespace to install the Agent and deploy applications. - Select Continue. The Review YAML settings appear. This is the manifest YAML for the Harness GitOps Agent. You can download this YAML file and run it in your Harness GitOps Agent cluster.
kubectl apply -f gitops-agent.yml -n default
- Select Continue and verify that the Agent is successfully installed and can connect to Harness Manager.
Perform the following steps:
- Select Start.
- In Name, enter the name of the existing Argo CD project.
- In Namespace, enter the namespace where you want to install the Harness GitOps Agent. Typically, this is the target namespace for your deployment. For this tutorial, use the
defaultnamespace to install the Agent and deploy applications. - Select Continue. The Review YAML settings appear. This is the manifest YAML for the Harness GitOps Agent. You can download this YAML file and run it in your Harness GitOps Agent cluster.
kubectl apply -f gitops-agent.yml -n default
- Select Continue and verify that the Agent is successfully installed and can connect to Harness Manager.
Once you have installed the Agent, Harness will start importing all the entities from the existing Argo CD Project.
- UI
- CLI
Set up the following in Harness Manager UI:
Repositories
A Harness GitOps repository contains the declarative description of a desired state. The declarative description can be in Kubernetes manifests, Helm Chart, Kustomize manifests, and so on.
Perform the following steps to add a repository:
- Select Settings in the top right corner of the UI.
- Select Repositories, and then select New Repository.
- Select Git and enter the following details:
- In Repository Name, enter the Git repository name.
- In GitOps Agent, select the Agent that you installed in your cluster and select Apply.
- In Git Repository URL, enter
https://github.com/GITHUB_USERNAME/harnesscd-example-apps.gitand replaceGITHUB_USERNAMEwith your GitHub username.
- Select Continue and choose Specify Credentials For Repository.
- In Connection Type, select HTTPS.
- In Authentication, select Anonymous (no credentials required).
- Select Save & Continue and wait for Harness to verify the connection.
- Select Finish.
Clusters
A Harness GitOps Cluster is the target deployment cluster that is compared to the desired state. Clusters are synced with the source manifests you add as GitOps Repositories.
Perform the following steps to add a new cluster:
- Select Settings in the top right corner of the UI.
- Select Clusters, and then select New Cluster.
- In the cluster Overview dialog, enter a name for the cluster.
- In GitOps Agent, select the Agent that you installed in your cluster and select Apply.
- Select Continue and select Use the credentials of a specific Harness GitOps Agent.
- Select Save & Continue and wait for Harness to verify the connection.
- Select Finish.
Applications
GitOps Applications are how you manage GitOps operations for a given desired state and its live instantiation.
A GitOps Application collects the Repository (what you want to deploy), Cluster (where you want to deploy), and Agent (how you want to deploy). You select these entities when you set up your Application.
Perform the following steps to add a new application:
-
Select Applications on the top right corner of the UI.
-
Select New Application.
-
In Application Name, enter the name
guestbook. -
In GitOps Agent, select the Agent that you installed in your cluster and select Apply.
-
Select New Service and toggle to the YAML view.
-
Select Edit YAML, paste the following, and then select Save.
service:name: gitopsguestbookidentifier: gitopsguestbookserviceDefinition:type: Kubernetesspec: {}gitOpsEnabled: trueFeature flag:CDS_GITOPS_MERGE_K8S_SERVICESWhen the feature flag
CDS_GITOPS_MERGE_K8S_SERVICESis enabled, the same service can be used in both CD stages and GitOps stages. You are responsible for populating the relevant fields in the service definition for your use case (for example, a Release Repository for the Update Release Repo step, or an App Set Reference for Fetch Linked Apps). Contact Harness Support to enable the feature flag. -
Select New Environment and toggle to the YAML view.
-
Select Edit YAML, paste the following, and then select Save.
environment:name: gitopsenvidentifier: gitopsenvdescription: ""tags: {}type: PreProductionorgIdentifier: defaultprojectIdentifier: default_projectvariables: [] -
Select Continue, keep the Sync Policy settings as is, and then select Continue.
-
In Repository URL, select the Repository you created earlier and select Apply.
-
Select
masteras the Target Revision and enterkustomize-guestbookin the Path, and click Enter. -
Select Continue to select the Cluster created in the above steps.
-
Enter the target Namespace for Harness GitOps to sync the application. Enter
defaultand select Finish.
Perform the following steps:
- Download and configure the Harness CLI.
- MacOS
- Linux
- Windows
curl -LO https://github.com/harness/harness-cli/releases/download/v0.0.25-Preview/harness-v0.0.25-Preview-darwin-amd64.tar.gz
tar -xvf harness-v0.0.25-Preview-darwin-amd64.tar.gz
export PATH="$(pwd):$PATH"
echo 'export PATH="'$(pwd)':$PATH"' >> ~/.bash_profile
source ~/.bash_profile
harness --version
- ARM
- AMD
curl -LO https://github.com/harness/harness-cli/releases/download/v0.0.25-Preview/harness-v0.0.25-Preview-linux-arm64.tar.gz
tar -xvf harness-v0.0.25-Preview-linux-arm64.tar.gz
curl -LO https://github.com/harness/harness-cli/releases/download/v0.0.25-Preview/harness-v0.0.25-Preview-linux-amd64.tar.gz
tar -xvf harness-v0.0.25-Preview-linux-amd64.tar.gz
a. Open Windows Powershell and run the following command to download the Harness CLI:
Invoke-WebRequest -Uri https://github.com/harness/harness-cli/releases/download/v0.0.25-Preview/harness-v0.0.25-Preview-windows-amd64.zip -OutFile ./harness.zip
b. Extract the downloaded zip file and change directory to extracted file location.
c. Perform the steps below to make it accessible via terminal.
$currentPath = Get-Location
[Environment]::SetEnvironmentVariable("PATH", "$env:PATH;$currentPath", [EnvironmentVariableTarget]::Machine)
d. Restart terminal.
-
Clone the Forked
harnesscd-example-appsrepo and change directory.git clone https://github.com/GITHUB_ACCOUNTNAME/harnesscd-example-apps.gitcd harnesscd-example-appsnoteReplace
GITHUB_ACCOUNTNAMEwith your GitHub Account name. -
Log in to Harness from the CLI.
harness login --account-id ACCOUNT_ID --api-key HARNESS_API_TOKENnoteReplace
HARNESS_API_TOKENwith Harness API Token that you obtained in Before you begin section of this tutorial.
For the pipeline to run successfully, follow all of the following steps as they are, including the naming conventions.
Repositories
A Harness GitOps repository contains the declarative description of a desired state. The declarative description can be in Kubernetes manifests, Helm Chart, Kustomize manifests, and so on.
Run the following command to add a Harness GitOps repository:
harness gitops-repository --file helm-guestbook/harness-gitops/repository.yml apply --agent-identifier $AGENT_NAME
Clusters
A Harness GitOps Cluster is the target deployment cluster that is compared to the desired state. Clusters are synced with the source manifests you add as GitOps Repositories.
Run the following command to add a Harness GitOps cluster:
harness gitops-cluster --file helm-guestbook/harness-gitops/cluster.yml apply --agent-identifier $AGENT_NAME
Applications
GitOps Applications are how you manage GitOps operations for a given desired state and its live instantiation.
A GitOps Application collects the Repository (what you want to deploy), Cluster (where you want to deploy), and Agent (how you want to deploy). You select these entities when you set up your Application.
Run the following command to create a GitOps application:
harness gitops-application --file helm-guestbook/harness-gitops/application.yml apply --agent-identifier $AGENT_NAME
Synchronize the application
After setting up the GitOps workflow, you can synchronize the application with your Kubernetes setup.
Perform the following steps:
-
Select Sync in the top right corner of the UI.
-
Check the application details, and then select Synchronize to initiate the deployment.
-
After a successful execution, you can check the deployment on your Kubernetes cluster using the following command:
kubectl get pods -n default -
To access the Guestbook application deployed via the Harness pipeline, port forward the service and access it at
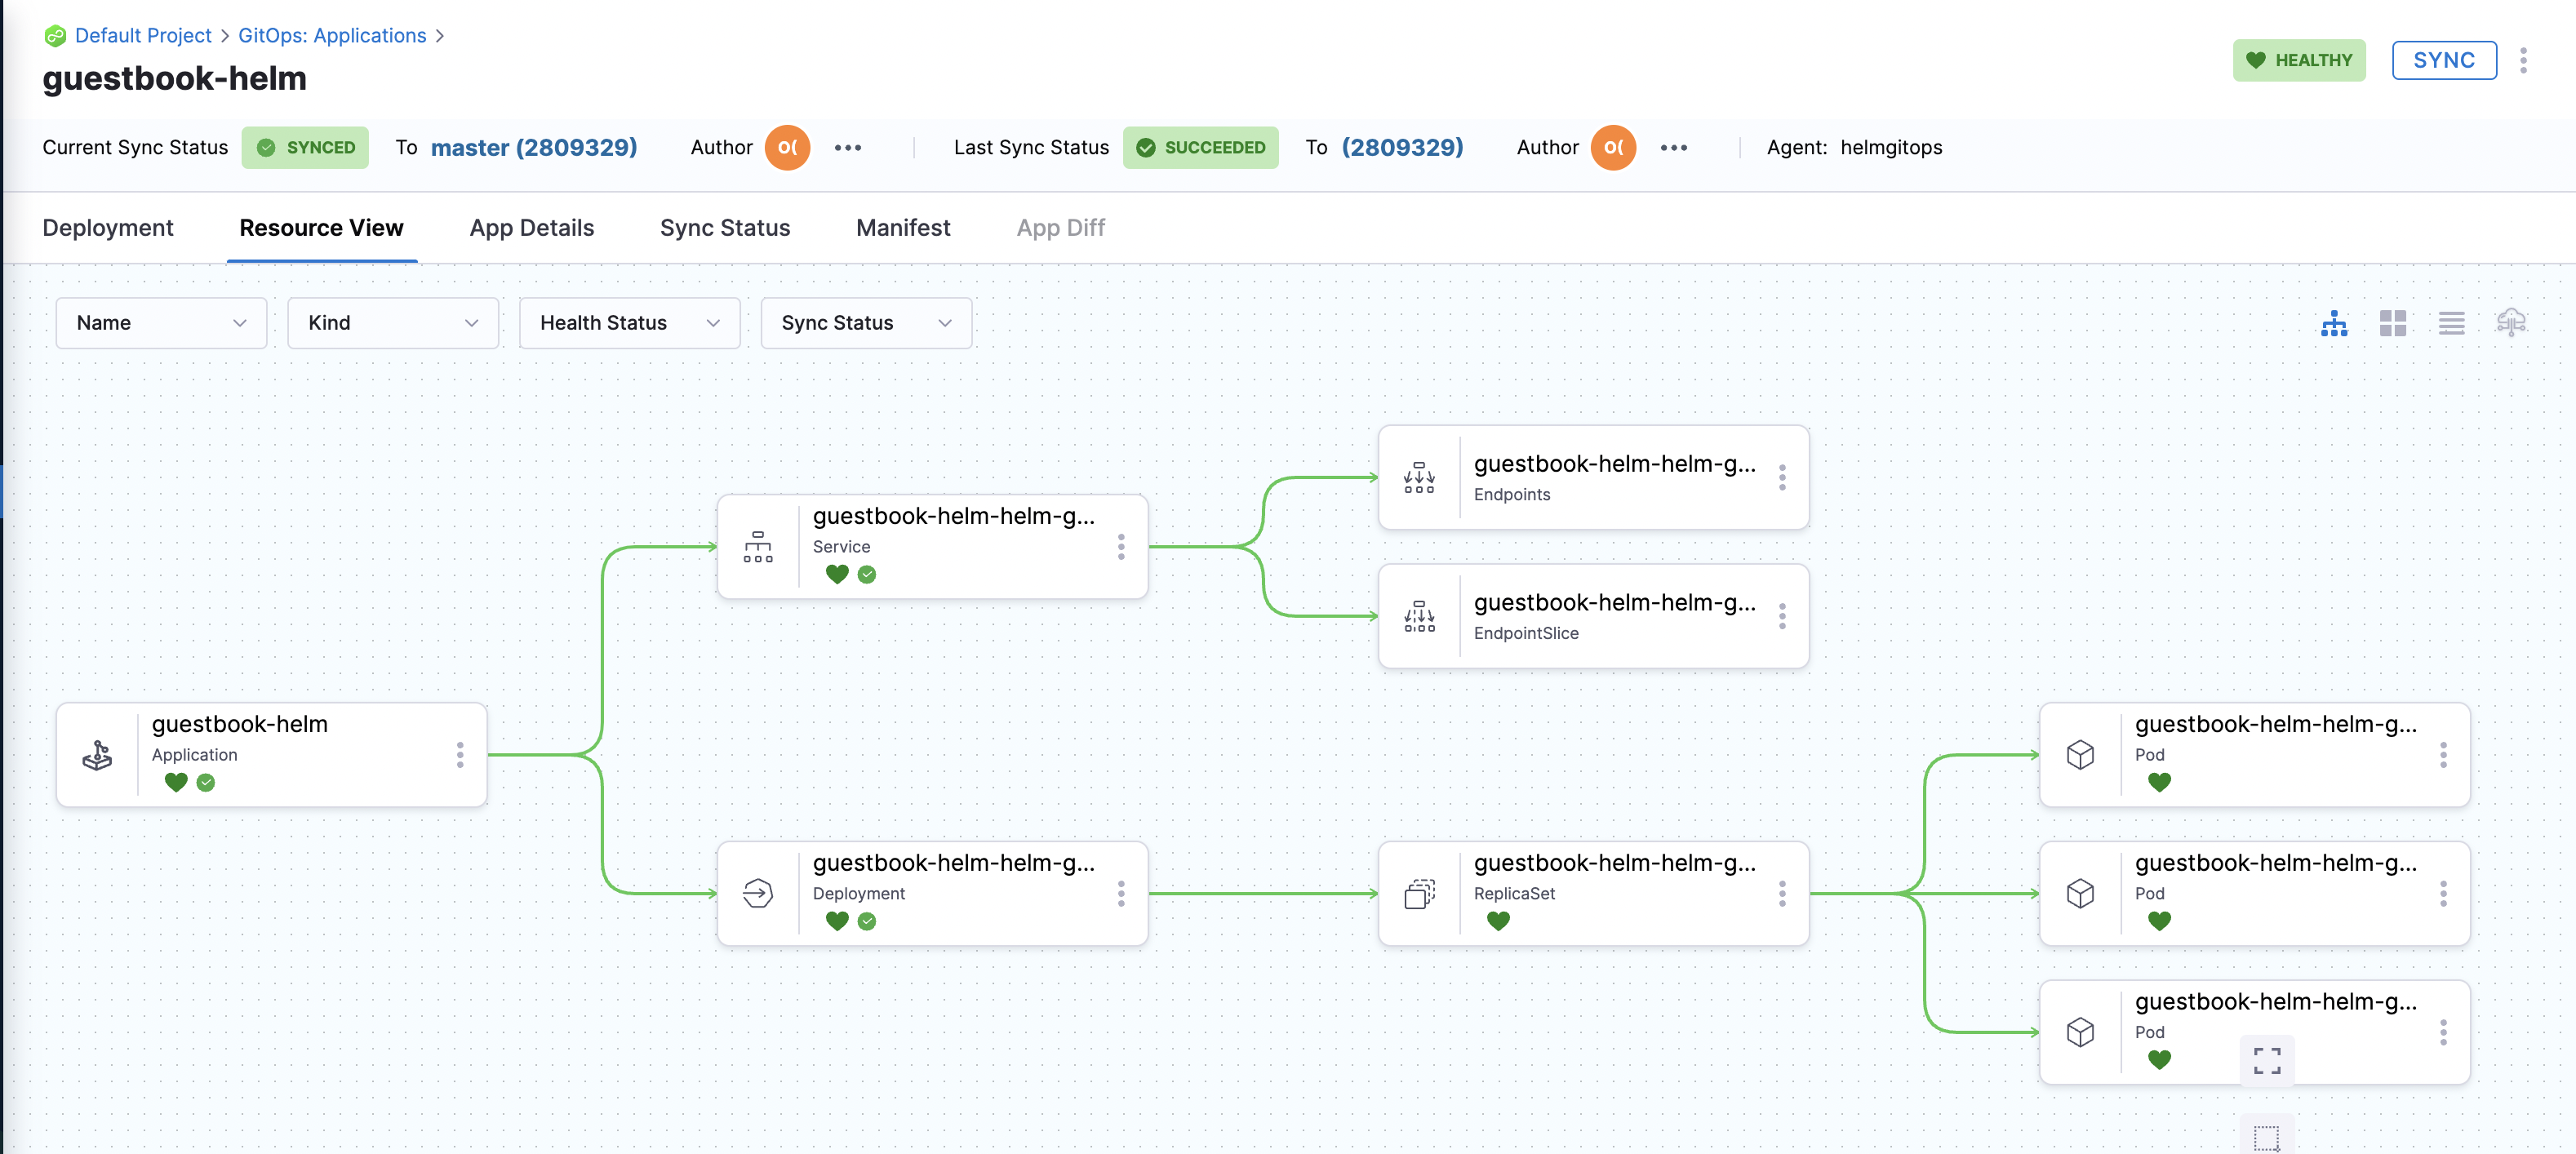
http://localhost:8080:kubectl port-forward svc/<service-name> 8080:80On successful application sync, you will see the status tree under Resource View as shown below.
Next steps
You have deployed the Guestbook application with Harness CD using a Helm chart.
Continue your learning journey with the following:
- Pipeline triggers: Run your pipeline automatically in response to Git events such as pushes and pull requests.
- Variables and expressions: Parameterize your pipeline with reusable values and runtime inputs.