Unified CI/CD Docker Hub Kubernetes pipeline
This topic explains an end-to-end software delivery workflow using Harness Continuous Integration (CI), Continuous Delivery (CD), and GitOps. You build an application, publish a container image to Docker Hub, and deploy it to a Kubernetes cluster using GitOps.
The following diagram explains the workflow used in this tutorial. The pipeline builds the application, pushes it to a Docker registry, and deploys it to a Kubernetes cluster. The pipeline features distinct stages for development and production environments, with an approval step to promote artifacts from development to production, ensuring thorough review and validation of changes.
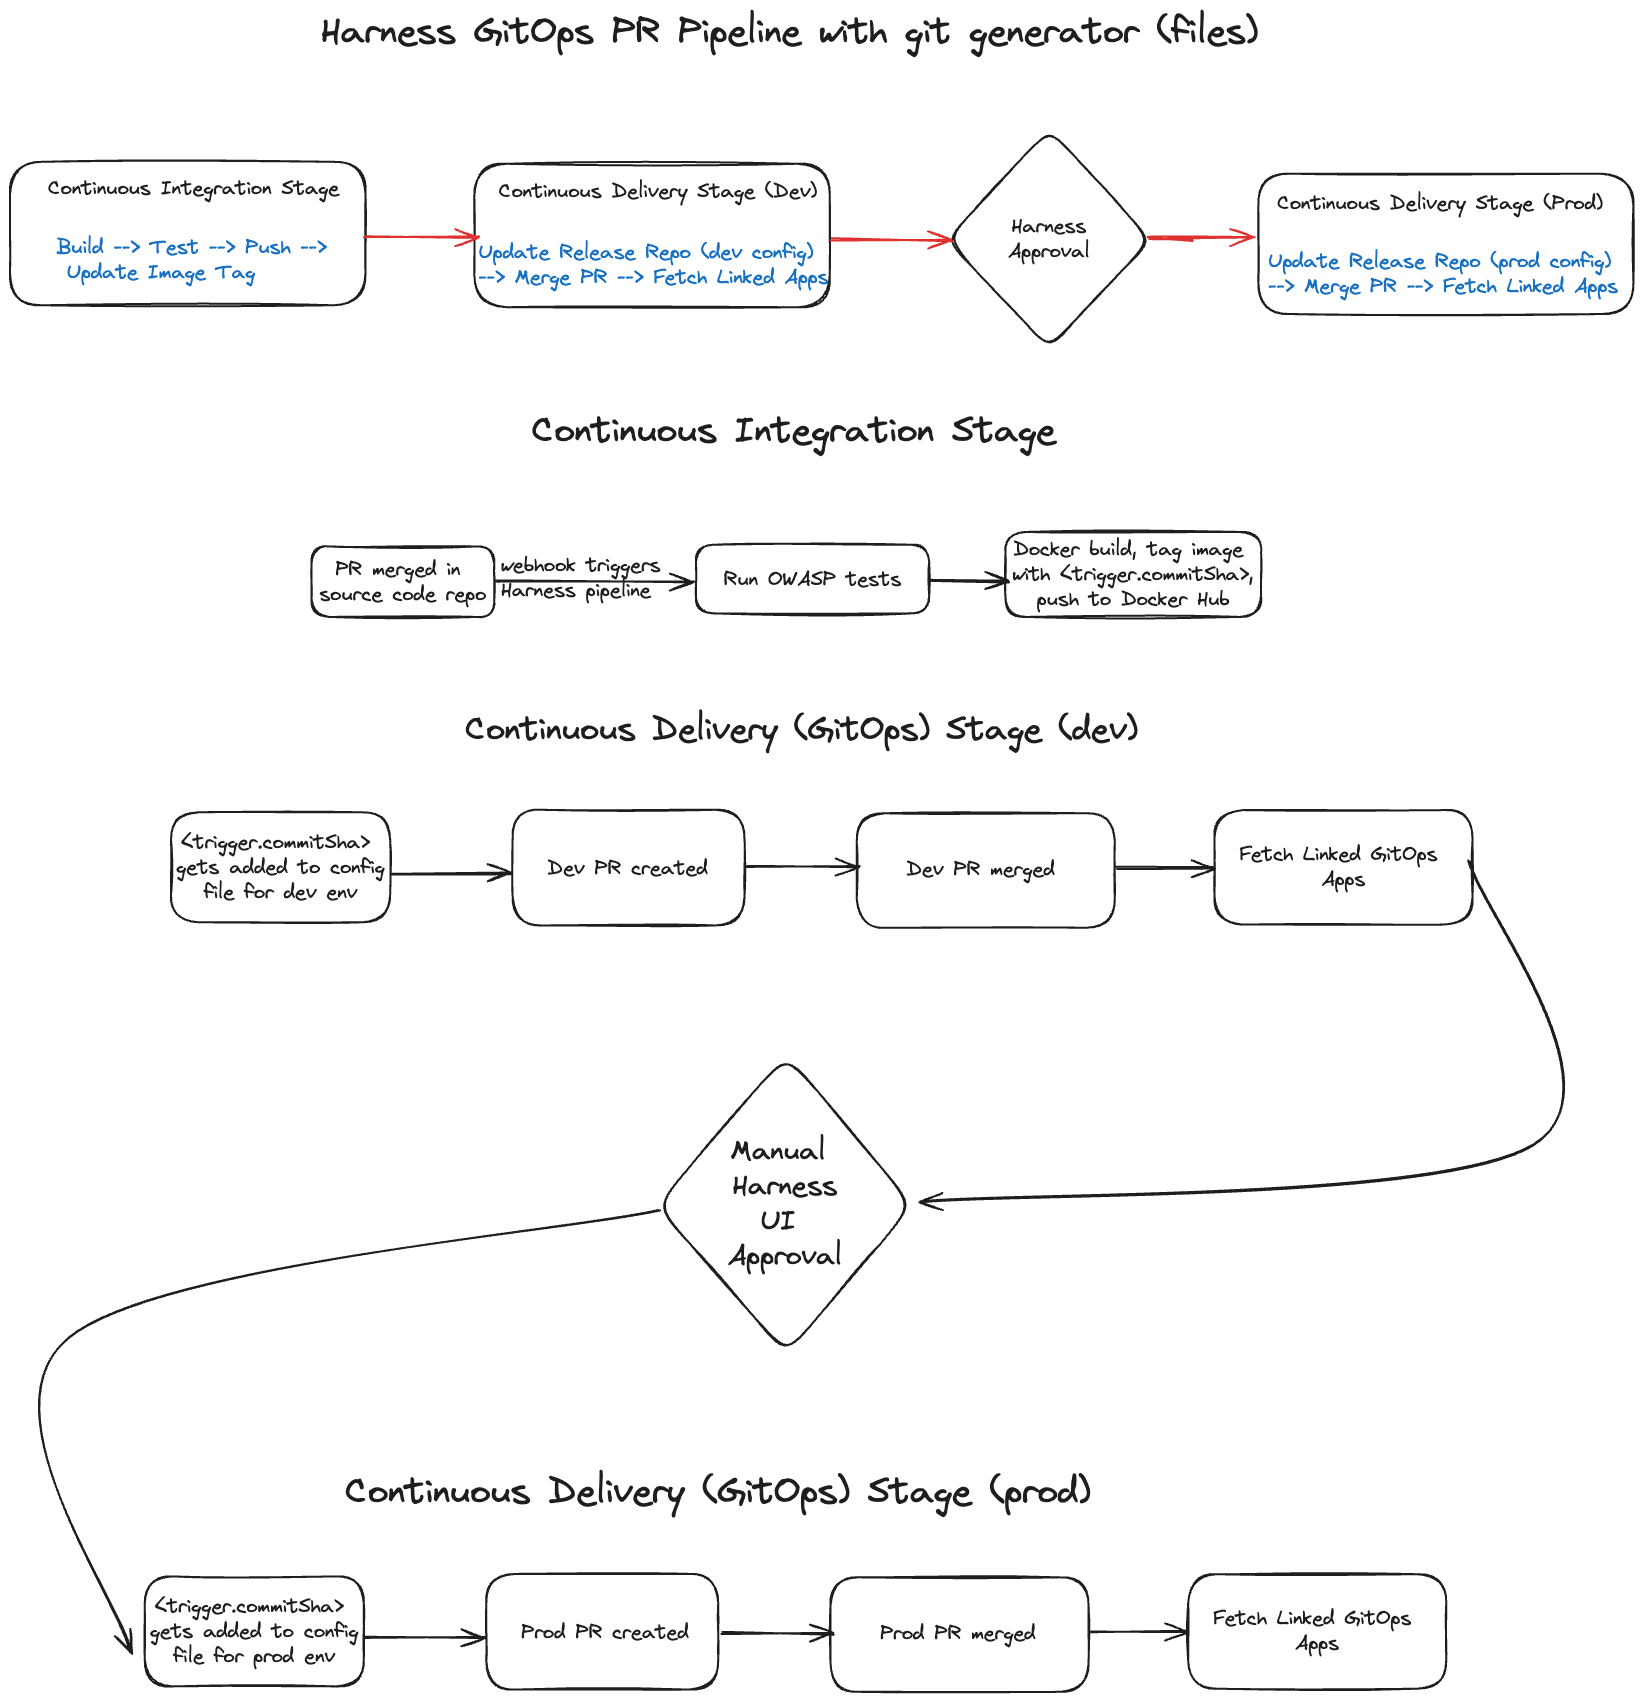
This tutorial is also available as a hands-on lab in the Harness CI/CD DevDays workshop.
What will you learn in this topic?
- How to build the application with a CI stage and push the image to a Docker registry.
- How to create an ApplicationSet to deploy the application to your Kubernetes cluster with GitOps.
- How to create a PR pipeline with an approval step to promote artifacts from development to production.
Before you begin
Ensure you have the following:
- Harness account: A free plan is sufficient. Go to sign up for free to create one.
- GitHub account: Fork the Harness GitOps Workshop repository to your own account.
- Docker Hub account: Access to push and pull container images.
- Kubernetes cluster: A local setup such as k3d is suitable.
- Harness CLI: Go to Install the Harness CLI to install it, then log in.
Set up secrets and connectors
To interact with your code repository (GitHub) and image registry (Docker Hub), the Harness platform needs to authenticate to these providers on your behalf. Connectors in Harness help you pull in artifacts, sync with repos, integrate verification and analytics tools, and use collaboration channels.
In this section, you create two secrets and two connectors for GitHub and Docker Hub. Before that, create two personal access tokens (PAT), one for GitHub and one for Docker Hub. Go to the GitHub docs and the Docker Hub docs to create personal access tokens. For GitHub, the token must have read/write access to the content, pull requests (PRs), and webhooks for your forked repository.
Once you are authenticated using the Harness CLI, clone your forked GitHub repo, replacing GITHUB_USERNAME with your actual GitHub user. Navigate to the cli-manifests directory.
git clone https://github.com/GITHUB_USERNAME/harness-gitops-workshop
cd harness-gitops-workshop/cli-manifests
Next, create two secrets, one for the GitHub PAT and another for the Docker Hub PAT. Replace the placeholder values (GITHUB_PAT and DOCKERHUB_PAT) with the actual secret values.
harness secret apply --token GITHUB_PAT --secret-name "github_pat"
harness secret apply --token DOCKERHUB_PAT --secret-name "docker_secret"
From your project setup, select Secrets, and you should see the newly created secrets added to the Harness Built-in Secrets Manager.
Now, create connectors for GitHub and Docker Hub.
To create a GitHub connector, run the following command:
harness connector --file github-connector.yaml apply
Enter your GitHub username and click Enter.
To create a Docker Hub connector, run the following command:
harness connector --file docker-connector.yaml apply
Enter your Docker Hub username and click Enter.
Build the CI stage
Next, create the Continuous Integration (CI) pipeline that performs the following:
- Clones the repository.
- Runs Open Web Application Security Project (OWASP) tests.
- If the tests pass, creates a build and pushes the container image to your Docker registry.
Make sure you are in the cli-manifests directory and update cipipeline.yaml to replace DOCKER_USERNAME with your Docker username.
Run the following command to create the cicd-gitops-pipeline with the CI stage:
harness pipeline --file cipipeline.yaml apply
Enter your Docker Hub username when prompted and click Enter.
Select Run, and then select Run Pipeline to start the pipeline execution. A successful pipeline execution produces a new image with the latest tag under the harness-gitops-workshop repository on your Docker image registry.
The OWASP scan step used within the CI stage is part of the Harness Security Testing Orchestration (STO) module. This step enables you to scan your code repositories and ingest results from OWASP Dependency-Check to detect publicly disclosed vulnerabilities present within a project's dependencies. For this example, fail_on_severity is initially set to none, but you have the flexibility to adjust it to any severity threshold, such as critical or high. If any vulnerabilities of a given severity, for instance critical, are found during the OWASP scan, the pipeline execution can be immediately terminated and the findings reported via a notification.
Create the ApplicationSet
An ApplicationSet generates multiple Argo CD applications from a single template. In this section, you install a GitOps agent, register a cluster and a repository, and create the GitOps application that deploys the workload.
For this section, you need a Kubernetes cluster. Run the following command to verify that you are connected to a Kubernetes cluster:
kubectl cluster-info
Create a GitOps agent
A Harness GitOps Agent is a worker process that runs in your environment, makes secure, outbound connections to Harness, and performs all the GitOps tasks you request in Harness.
Perform the following steps to install a GitOps agent:
-
Select Deployments, and then select GitOps.
-
Select Settings, and then select GitOps Agents.
-
Select New GitOps Agent.
-
For this workshop, create a new GitOps agent. When prompted with Do you have any existing Argo CD instances?, select No, and then select Start to install the Harness GitOps Agent.
-
In GitOps Operator, select Argo to use Argo CD as the GitOps reconciler.
-
In Namespace, enter the namespace where you want to install the Harness GitOps Agent. For this tutorial, use the
defaultnamespace to install the Agent and deploy applications. -
Select Continue. The Download YAML or Download Helm Chart settings appear.
Download the Harness GitOps Agent script using either the YAML or Helm Chart option. The YAML option provides a manifest file, and the Helm Chart option offers a Helm chart file. Both can be downloaded and used to install the GitOps agent on your Kubernetes cluster. The third step includes the command to run this installation. Run that command against your cluster.
-
Select Continue and verify that the Agent is successfully installed and can connect to Harness Manager.
-
On your terminal, run the following command to set the GitOps agent identifier you created earlier as a shell variable:
export AGENT_NAME=<GITOPS_AGENT_ID>noteThe ID of the GitOps agent might not be the same as its name.
Create a GitOps cluster
A Harness GitOps Cluster is the target deployment cluster that is compared to the desired state. Clusters are synced with the source manifests you add as GitOps Repositories.
Create a Harness GitOps Cluster by running the following command:
harness gitops-cluster --file gitops-cluster.yaml apply --agent-identifier $AGENT_NAME
Create a GitOps repository
A Harness GitOps Repository is a repository containing the declarative description of a desired state. The declarative description can be in Kubernetes manifests, Helm Chart, Kustomize manifests, and so on.
Open cli-manifests/gitops-repo.yaml in your code editor and replace GITHUB_USERNAME with your GitHub username. Create a Harness GitOps Repository by running the following command:
harness gitops-repository --file gitops-repo.yaml apply --agent-identifier $AGENT_NAME
Create the GitOps application with ApplicationSet
GitOps Applications manage GitOps operations for a given desired state and its live instantiation. A GitOps Application collects the Repository (what you want to deploy), Cluster (where you want to deploy), and Agent (how you want to deploy).
Examine the YAML manifest:
gitops:
  name: gitops-application
  projectIdentifier: default_project
  orgIdentifier: default
  type: application
  application:
    metadata:
      clusterName: gitops_cluster
      labels:
        harness.io/serviceRef: ""
        harness.io/envRef: ""
    spec:
      source:
        repoURL: https://github.com/GITHUB_USERNAME/harness-gitops-workshop
        path: configs/git-generator-files-discovery
        targetRevision: main
      destination:
        server: https://kubernetes.default.svc
        namespace: default
  agentIdentifier: AGENT_NAME
  clusterIdentifier: gitopscluster
  repoIdentifier: gitopsrepo
This manifest brings together the Harness GitOps Agent, the Harness GitOps Repository, and the Harness GitOps Cluster. Under spec > source, you can see the repoURL, path, and branch from which the ApplicationSet definition is fetched. spec > destination denotes the target Kubernetes cluster and namespace. In this workshop, you create the ApplicationSet CRD in the same namespace where the GitOps Agent is installed, that is, the default namespace.
Examine configs/git-generator-files-discovery/git-generator-files.yaml:
apiVersion: argoproj.io/v1alpha1
kind: ApplicationSet
metadata:
  name: podinfo
spec:
  generators:
    - git:
        repoURL: https://github.com/GITHUB_USERNAME/harness-gitops-workshop.git
        revision: HEAD
        files:
        - path: "configs/git-generator-files-discovery/cluster-config/**/config.json"
  template:
    metadata:
      name: '{{cluster.namespace}}-podinfo'
    spec:
      project: ARGO_PROJECT_ID
      source:
        repoURL: https://github.com/GITHUB_USERNAME/harness-gitops-workshop.git
        targetRevision: HEAD
        path: "configs/git-generator-files-discovery/apps/podinfo"
      destination:
        server: '{{cluster.address}}'
        namespace: '{{cluster.namespace}}'
      syncPolicy:
        syncOptions:
        - CreateNamespace=true
The Git file generator is a subtype of the Git generator. The Git file generator generates parameters using the contents of JSON/YAML files found within a specified repository. template.spec.project refers to the Argo CD project ID that is mapped to your Harness project.
Navigate to GitOps > Settings > GitOps: Agents to find the project ID. Update the project in git-generator-files.yaml in your GitHub forked repo with the ID you see there.
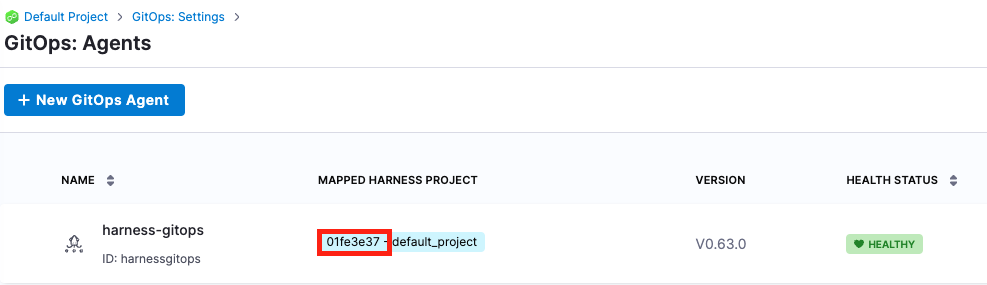
Also, replace GITHUB_USERNAME in the git-generator-files.yaml file with your actual GitHub user.
Create a Harness GitOps Application by running the following command:
harness gitops-application --file gitops-app.yaml apply --agent-identifier $AGENT_NAME
Enter your GitHub user when prompted, and then click Enter.
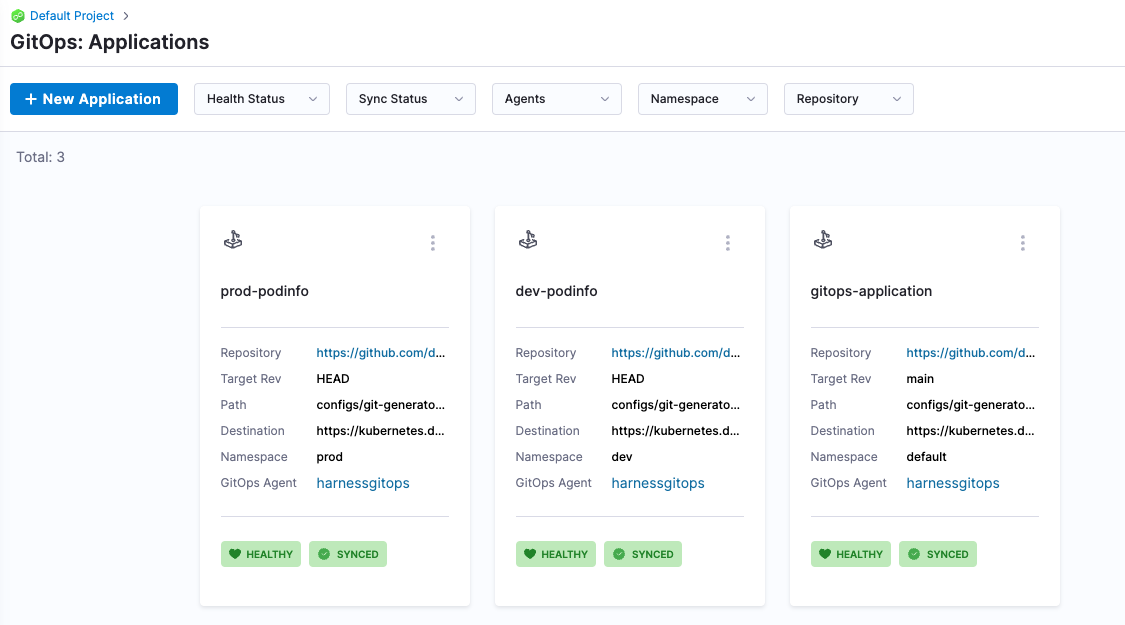
Under GitOps: Applications, select gitops-application, select Sync, and then select Synchronize. The ApplicationSet CRD creates two Argo CD applications, one in the dev namespace and the other in the prod namespace.
Navigate back to GitOps > Applications. Repeat the previous step to sync your dev and prod apps. All applications should now be synced and healthy.
Create the PR pipeline
Harness pipelines define the steps needed to build, test, and deploy your application. You described your deployment using the GitOps entities you set up previously. You will now create a pipeline that performs the following steps:
- Runs an OWASP security scan to identify publicly disclosed vulnerabilities.
- Compiles the
podinfosource code. - Builds and publishes the updated app to Docker Hub.
- Creates and merges a GitHub pull request of any configuration changes to the
devenvironment. - Enforces a manual approval before deploying to
prod. - Creates and merges a GitHub pull request of any configuration changes to the
prodenvironment.
Harness pipelines require a delegate to run pipeline tasks. You also need a delegate token. You can reuse the default delegate token or create a new token.
You can find your Harness account ID in any Harness URL, for example:
https://app.harness.io/ng/#/account/ACCOUNT_ID/home/get-started
Export the Harness account ID and delegate token values as environment variables:
export HARNESS_ACCOUNT_ID=YOUR_HARNESS_ACCOUNT_ID
export DELEGATE_TOKEN=YOUR_HARNESS_DELEGATE_TOKEN
Run the following commands to install the delegate in your cluster (the same cluster in which you have the agent installed).
helm repo add harness-delegate https://app.harness.io/storage/harness-download/delegate-helm-chart/
helm repo update harness-delegate
helm upgrade -i helm-delegate --namespace harness-delegate-ng --create-namespace \
  harness-delegate/harness-delegate-ng \
  --set delegateName=helm-delegate \
  --set accountId=$HARNESS_ACCOUNT_ID \
  --set delegateToken=$DELEGATE_TOKEN \
  --set managerEndpoint=https://app.harness.io/gratis \
  --set delegateDockerImage=harness/delegate:23.11.81601 \
  --set replicas=1 --set upgrader.enabled=true
Then navigate to Project Setup > Delegates and confirm that your delegate checks in to Harness.
Next, run the following commands to create your environment and service entities.
harness environment --file environment-dev.yaml apply
harness environment --file environment-prod.yaml apply
harness service --file service.yaml apply
After applying the manifests, navigate to the Environments tab. Select the dev environment, then GitOps Clusters, and then + Select Cluster(s). Map your gitops_cluster to this environment. Do the same for the prod environment.
Run the following command to update the pipeline with CD stages. Enter your Docker and GitHub usernames when prompted.
harness pipeline --file prpipeline.yaml apply
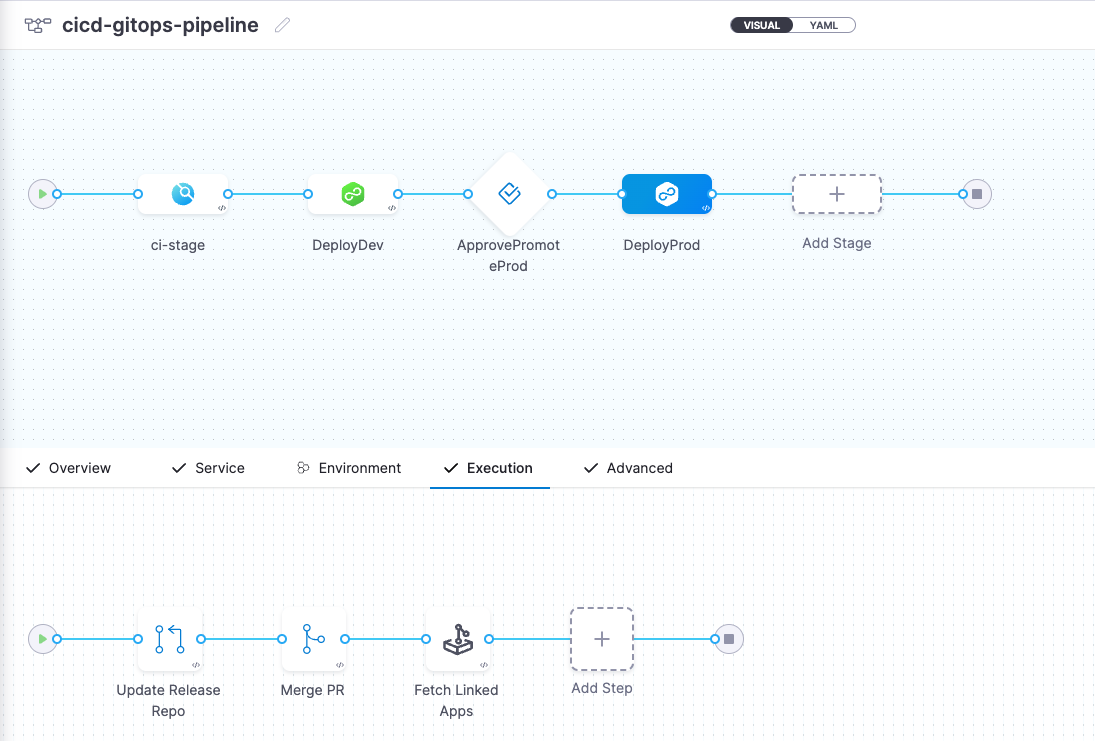
The full pipeline should look as follows in the Harness Pipeline Studio:
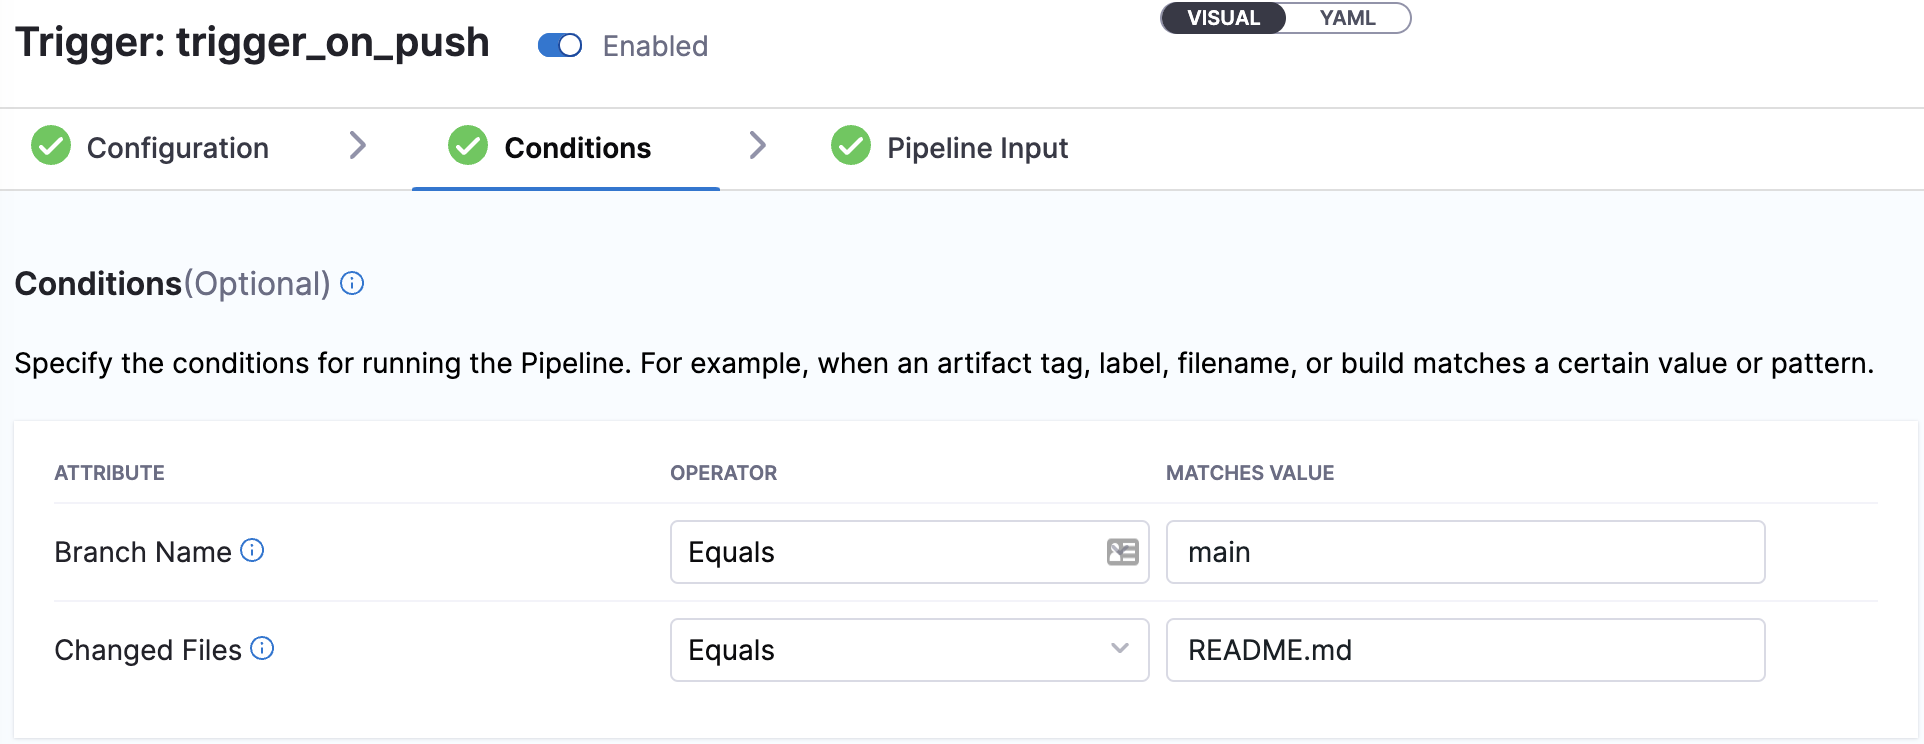
Finally, create a trigger to run the PR pipeline when new code is committed to the main branch of your GitHub forked repo. Since some of the GitOps steps also commit to the main branch to update the release repo manifest, it is essential to add specific conditions to prevent an infinite loop. Here, README.md serves as an example. In practice, you may choose a condition based on any change to the application source code.
Run the pipeline
You can start the pipeline in either of the following ways:
- Commit a change to any non-
configsfile (such as aREADME.md) on themainbranch of your GitOps workshop repo (https://github.com/YOUR_GITHUB_USERNAME/harness-gitops-workshop) to trigger the PR pipeline. Notice that the codebase commit SHA is tracked throughout the pipeline, from the image SHA to theconfig.jsonof the deployed applications. - Select Run Pipeline in the Harness UI. Optionally, you can provide any updates to environment config variables.
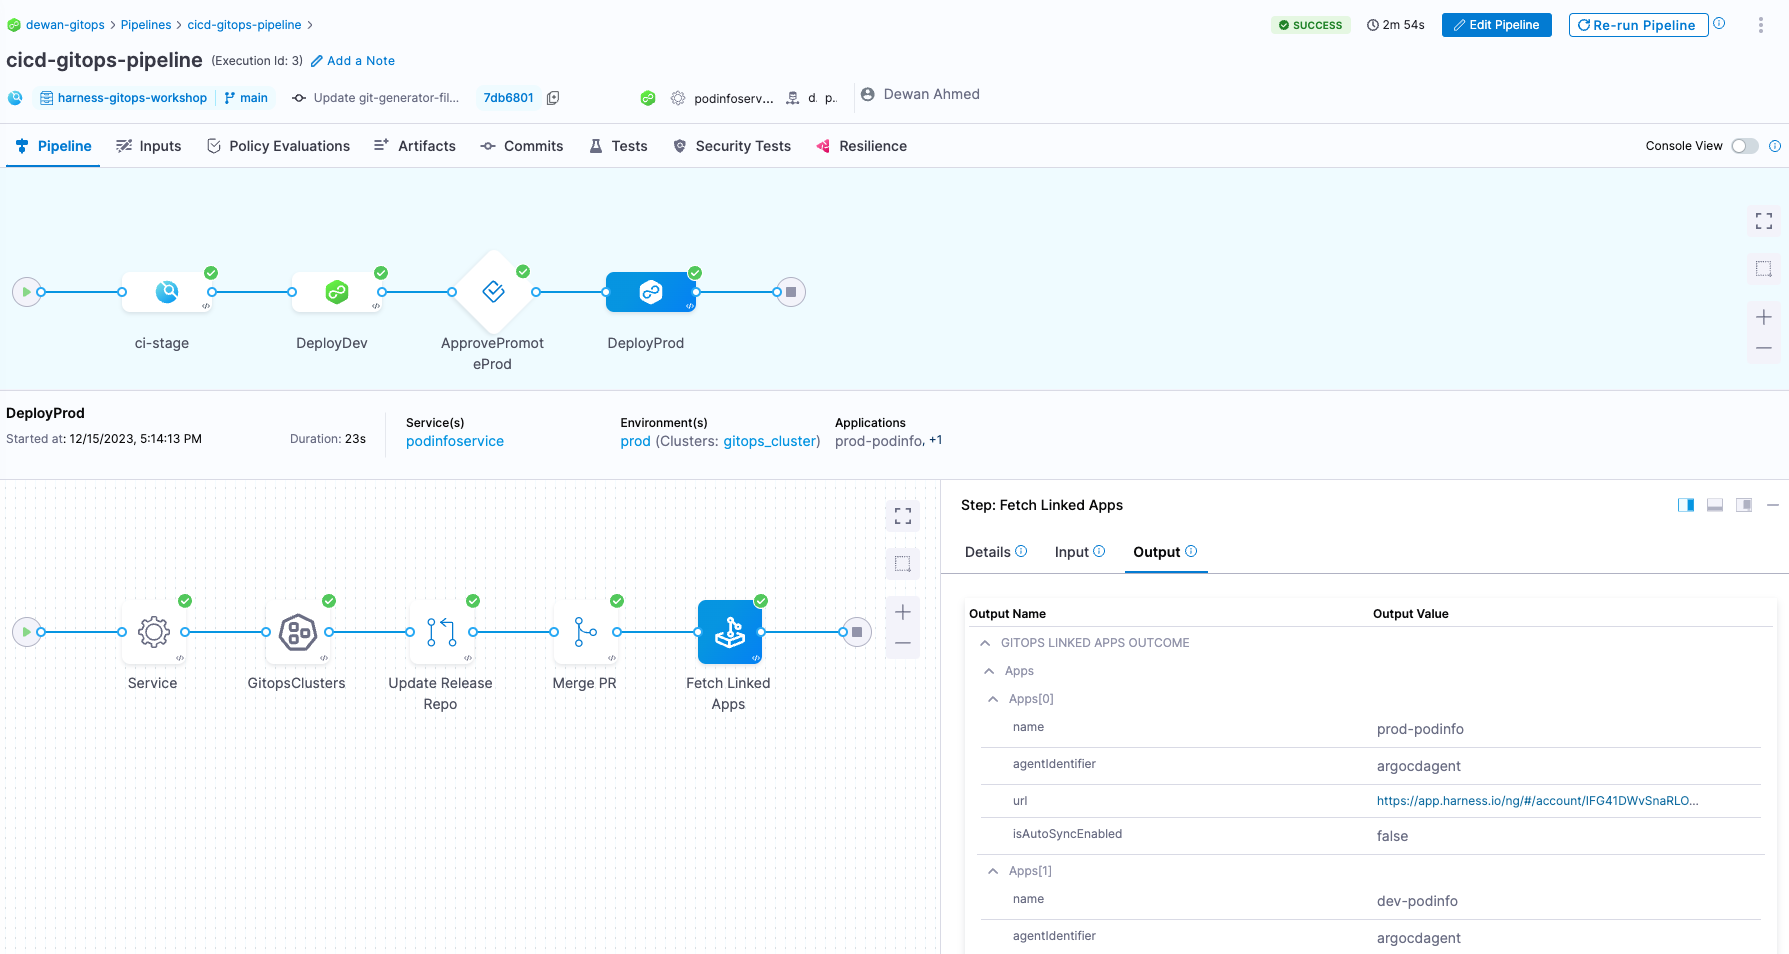
A successful execution shows a Succeeded status for each stage in the pipeline.
Next steps
You have built a unified CI/CD pipeline that builds an image, deploys it with GitOps, and promotes changes from development to production through pull requests and a manual approval. Continue your learning journey with the following:
- Harness GitOps ApplicationSet and PR Pipeline Tutorial: Explore ApplicationSets in more depth.
- Triggering pipelines: Refine how your pipeline responds to Git events.