Create a Kubernetes Blue Green deployment
This guide shows you how to create a Blue Green deployment for Kubernetes workloads. Blue Green deployments maintain two identical environments (blue and green) and switch traffic between them, enabling rapid rollback by routing traffic back to the previous environment without redeploying.
For conceptual information on Blue Green deployments, go to Deployment Concepts and Strategies to understand the strategy. For a comparison across platforms, go to Blue-Green Deployment Across Platforms to see platform-specific differences.
Before you begin
-
Harness account with Continuous Delivery enabled: You need access to Continuous Delivery in Harness. For how to access or create a Harness account, go to Getting started with Harness Platform to set up your account.
Contact Harness support:If Continuous Delivery does not appear, go to Get started with CD to review requirements or contact your account administrator or Harness Support.
-
Kubernetes cluster: You need a target Kubernetes cluster where you can deploy workloads. Go to Define Your Kubernetes Target Infrastructure to configure your cluster connection.
-
Kubernetes manifests: You need Deployment manifests and Service manifests for your application. Go to Add Kubernetes Manifests to add manifests to your service.
-
Pipeline permissions: You need View, Create/Edit, and Execute for Pipelines. To get these, an administrator must assign you a role that includes them. Go to RBAC in Harness to understand roles and go to Manage roles to learn how to assign them.
Harness Blue Green strategy supports Kubernetes Deployment workloads only. Only one deployment workload is supported per service. Having multiple workloads in service manifests results in deployment failure. For other workload types, go to What Can I Deploy in Kubernetes? to review supported options.
Configure service manifests for Blue Green
Before creating the pipeline, configure your Kubernetes service manifests with the annotations Harness uses to identify primary and stage environments.
Single service configuration
When you use only one Kubernetes service in your manifests, Harness automatically creates a duplicate stage service with the -stage suffix. No annotations are required.
Single Kubernetes service example
apiVersion: v1
kind: Service
metadata:
  name: {{.Values.name}}-svc
spec:
  type: {{.Values.serviceType}}
  ports:
  - port: {{.Values.servicePort}}
    targetPort: {{.Values.serviceTargetPort}}
    protocol: TCP
  selector:
    app: {{.Values.name}}
This service does not include any harness.io annotations because Harness automatically identifies it as the primary service and creates a corresponding stage service.
Sample deployment and values.yaml files are publicly available on the Harness Docs repo.
Two services configuration
When you use two services in your manifests, annotate them so Harness can identify which is primary and which is stage.
Add these annotations:
- Primary service:
harness.io/primary-service: "true" - Stage service:
harness.io/stage-service: "true"
Two Kubernetes services example
apiVersion: v1
kind: Service
metadata:
  name: test-deploy-svc-1
  annotations:
    harness.io/primary-service: "true"
spec:
  type: ClusterIP
  ports:
    - port: 80
      targetPort: 80
      protocol: TCP
  selector:
    app: nginx
---
apiVersion: v1
kind: Service
metadata:
  name: test-deploy-svc-2
  annotations:
    harness.io/stage-service: "true"
spec:
  type: ClusterIP
  ports:
    - port: 80
      targetPort: 80
      protocol: TCP
  selector:
    app: nginx
Understand the Blue Green deployment flow
Harness manages Blue Green deployments by maintaining two pod sets (blue and green) and swapping service selectors to route traffic. The deployment flow differs between first deployment and subsequent deployments.
First deployment
- Harness creates two services (primary and stage) and one pod set for the application
- The pod set receives the annotation
harness.io/color: blue - Harness points the stage service at the blue pod set and verifies steady state
- Harness swaps the primary service to the blue pod set, routing production traffic to the application
Second deployment (new version)
- Harness creates a new pod set for the new application version with annotation
harness.io/color: green - Harness points the stage service at the green pod set and verifies steady state
- Harness swaps the primary service to the green pod set and the stage service to the blue pod set
Third and subsequent deployments
- Harness deploys the new app version to the pod set not currently serving production traffic
- Harness points the stage service at the new pod set and verifies steady state
- Harness swaps the primary service to the new pod set and the stage service to the old pod set
Create the deployment pipeline
The following steps configure a CD pipeline with the Blue Green deployment strategy.
Step 1: Create the pipeline stage
In the Harness project, create a CD pipeline and add a deployment stage. On the Service tab, select or create a service that includes your Kubernetes manifests.
On the Infrastructure tab, select or create an infrastructure definition that points to your target Kubernetes cluster. Go to Define Your Kubernetes Target Infrastructure to configure the infrastructure if needed.
Step 2: Add Blue Green execution steps
In the stage Execution tab, select Add Step and choose the Blue Green deployment strategy.
Harness automatically adds the required steps:
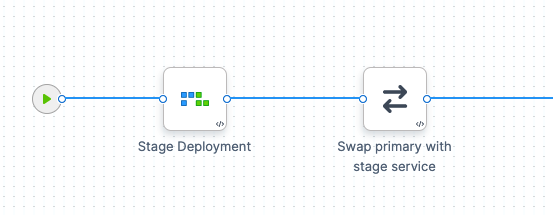
The Blue Green strategy includes these steps:
- Stage Deployment: Deploys the new version to the stage environment
- Swap Primary with Stage: Routes production traffic to the new version
You can add optional steps:
- Verification steps: Add between Stage Deployment and Swap steps to validate the stage environment before routing traffic
- Blue Green Stage Scale Down: Scales down the previous stage environment to conserve resources
- Blue Green Stage Scale Up: Restores a previously scaled-down environment
Step 3: Configure Stage Deployment step
The Stage Deployment step deploys your application to the stage environment and verifies it reaches steady state.
Select the Stage Deployment step to configure these options:
Skip Dry Run: By default, Harness uses the --dry-run flag on kubectl apply during initialization to validate manifests without applying them. Enable this option to skip the dry run and apply manifests immediately.
Skip Deployment if Using the Manifest Used in a Previous Deployment: Enable this option to have Harness compare rendered manifests with the last deployment. If no changes are detected, Harness skips the step and progresses to subsequent steps. This prevents manipulation of routes or labels when manifests are unchanged.
Step 4: Configure Swap Primary with Stage step
The Swap Primary with Stage step switches the primary and stage service selectors to route production traffic to the new version.
After the swap:
- The primary service points to the new version (blue or green, depending on the deployment)
- The stage service points to the previous version
This step does not perform post-swap health checks. Harness assumes the stage deployment was successful and the service is ready for traffic. To verify the new primary environment after the swap, add a Verify, Shell Script, or HTTP step after the Swap step to check pod readiness or hit health endpoints.
Optional: Add Blue Green Stage Scale Down step
After routing production traffic to the new version, you can scale down the inactive environment to conserve resources.
Select Add Step and choose Blue Green Stage Scale Down. This step scales down the last successful stage environment.
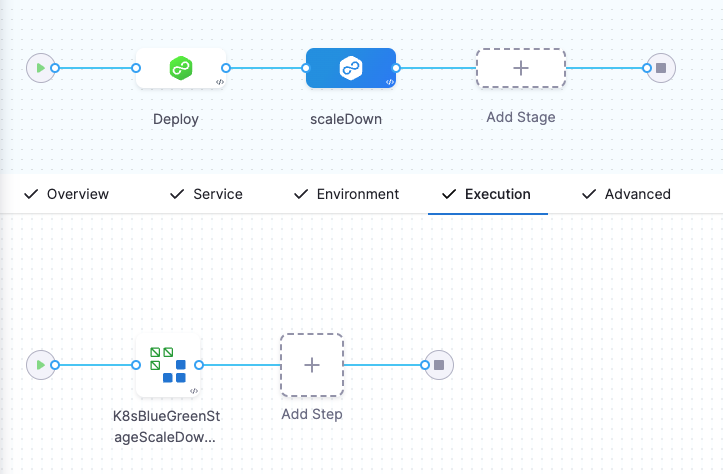
The Scale Down step performs these operations:
- Removes HorizontalPodAutoscaler and PodDisruptionBudget resources
- Deletes Deployments, DeploymentConfigs, and StatefulSets
- Scales down DaemonSets to zero replicas
Previously, Harness scaled down deployments by setting replicas to 0. This caused issues when HPA was configured because the replicas field remained 0 on subsequent deployments. Harness now deletes these resources instead of scaling them to 0. The Scale Up step can restore deleted workloads (with declarative rollback) using stored manifests and replica counts. Note that HPA and PDB resources are permanently removed and require redeployment to restore.
You can configure the Scale Down step in the same stage as the deployment or in a different stage, based on when you want to scale down resources.
When deploying multiple services to the same namespace using Blue Green, ensure each service has a unique release name. If multiple services share the same release name in the same namespace, the Scale Down step may incorrectly identify which deployment to scale down.
The Scale Down step identifies resources from the release history, which is mapped to a release name. Ensure the infrastructure definition for the Scale Down step matches the infrastructure definition used for the Blue Green deployment.
When to use Scale Down
Use Scale Down when you want to conserve cluster resources after a successful deployment and you are confident you will not need to roll back to the previous version. Blue Green deployments enable rapid rollback by routing traffic back to the previous pods, but this requires keeping the previous environment running.
The Scale Down step removes or deletes workloads to conserve resources. You can restore scaled-down environments using the Blue Green Stage Scale Up step. The Scale Up step can restore workloads that were scaled to zero replicas and deleted workloads (with declarative rollback). However, HPA and PDB resources are permanently removed during Scale Down and are not recreated by Scale Up. Scale Up can only restore environments if the release history contains the captured state from a prior Scale Down operation. If you delete the release history or perform cleanup that removes historical data, Scale Up cannot restore the environment.
Optional: Add Blue Green Stage Scale Up step
After scaling down a stage environment, you can restore it using the Blue Green Stage Scale Up step. This step reverses the Scale Down operation.
This feature is behind the feature flag CDS_K8S_BG_STAGE_SCALE_UP. Contact Harness Support to enable the feature.
How Scale Up works
When you scale down a stage environment, Harness captures and stores the original replica counts and resource configurations. The Scale Up step uses this information to restore the environment.
The Scale Up step performs these operations:
- Checks the release history for workloads that were scaled down in a previous Blue Green Stage Scale Down step
- Scales workloads back to their original replica counts (works for both scaled-to-zero and deleted workloads with declarative rollback)
- Optionally waits for scaled-up workloads to reach steady state
- Deleted workloads: Can only be recreated with declarative rollback. With imperative rollback, recreation is only possible if the workload was scaled to zero (not deleted).
- HPA and PDB: These resources are deleted during Scale Down and are not recreated during Scale Up. You must redeploy to restore HPA and PDB resources.
When to use Scale Up
Use the Scale Up step when you need to restore a scaled-down environment in these scenarios:
- Preparing for rollback: Scale up the previous version before performing a rollback to ensure pods are running and healthy
- Re-validation: Bring the inactive environment back online to re-test or validate the previous version
- Gradual resource management: Scale down during low-traffic periods and scale up when you need capacity
- Failed deployments: Restore the stage environment after a deployment failure to maintain both environments for troubleshooting
Configure the Scale Up step
Select Add Step and choose Blue Green Stage Scale Up. Configure these options:
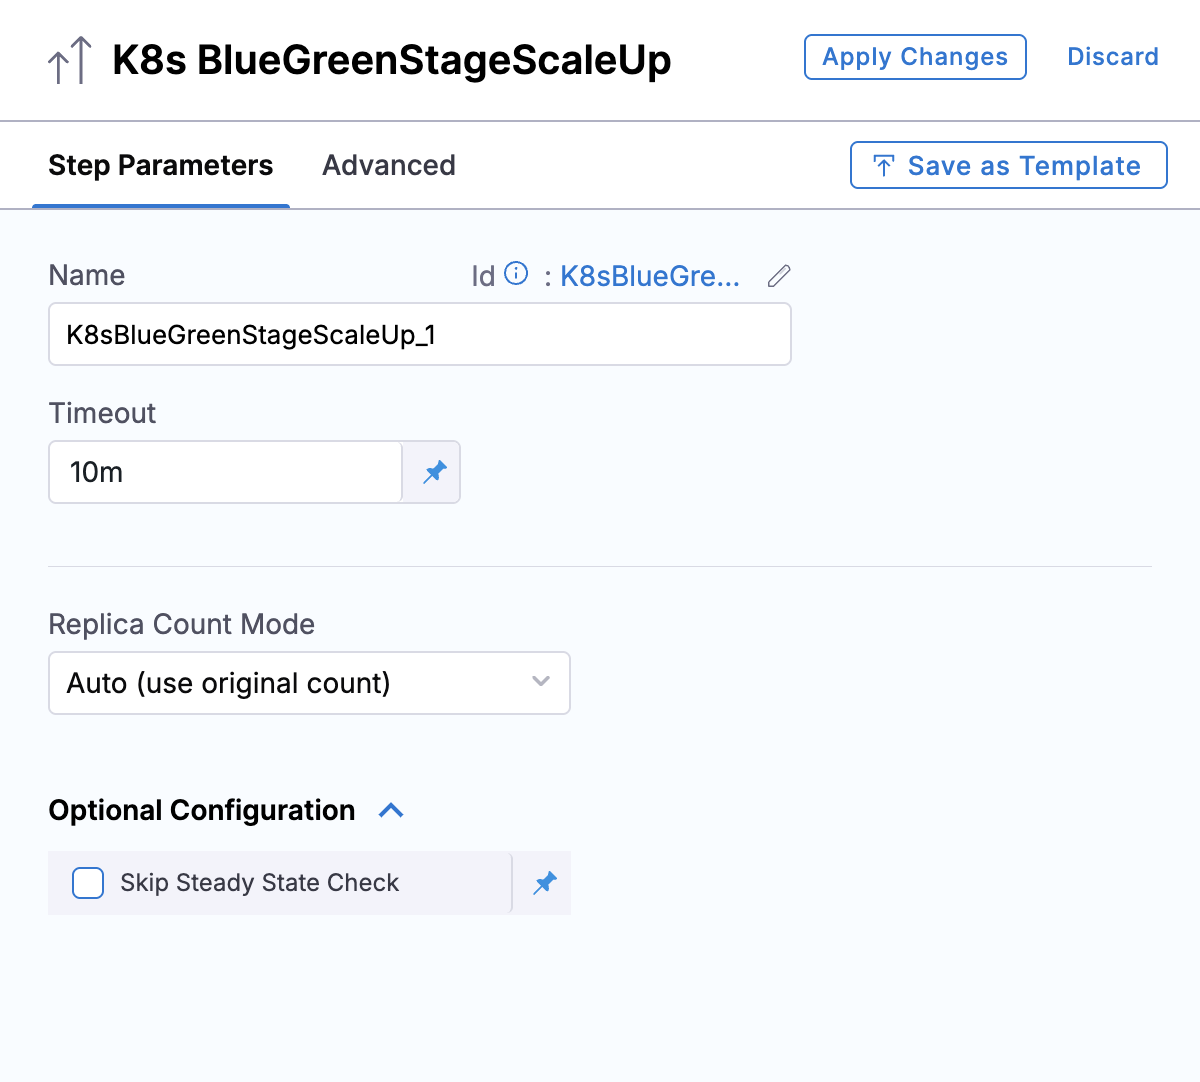
Replica Count Mode: Choose how to determine the replica count when scaling up:
- Auto (use original count) (recommended): Harness automatically restores workloads to the replica counts captured before the Scale Down operation. This ensures the environment is restored exactly as it was.
- Custom: Specify a fixed replica count to use when scaling up all workloads, overriding the captured values.
Skip Steady State Check: When enabled, Harness scales up the workloads but does not wait for them to reach steady state before proceeding. Use this when you want to scale up in the background and continue the pipeline without waiting.
Scale Up behavior
The Scale Up step handles different scenarios:
- No prior scale down: If no Blue Green Stage Scale Down was performed for the current release, the step skips execution
- Already scaled up: If the stage environment is already running with non-zero pods, the step skips those workloads
- Deleted workloads: With declarative rollback, the Scale Up step can recreate deleted workloads using manifests and replica counts stored in the release history. With imperative rollback, only scaled-to-zero workloads can be restored (not deleted workloads).
Example workflow with Scale Up and Scale Down
A common Blue Green deployment workflow:
- Stage Deployment: Deploy new version to stage environment
- Verification: Run tests against stage environment
- Swap Primary with Stage: Route production traffic to new version
- Scale Down: Scale down the old version to conserve resources
Time passes while a new deployment is prepared.
- Scale Up: Before deploying the next version, scale up the current stage environment to ensure rollback capacity
- Stage Deployment: Deploy next version to the now-active stage environment
This workflow ensures you always have a standby environment ready for rapid rollback while minimizing resource usage between deployments.
Consider using Scale Up before performing rollbacks to ensure the inactive environment is ready to receive traffic. The Blue Green deployment strategy shifts traffic between environments but does not validate whether the active environment is running the correct version. That validation is the responsibility of the Stage Deployment step and any verification steps you add.
Optional: Configure traffic routing
For advanced traffic management during Blue Green deployments, you can configure gradual traffic shifts between primary and stage services.
Traffic routing allows you to split traffic percentages between the two environments during the swap phase, enabling canary-style validation of the new version before committing full production traffic.
Go to Traffic Routing Step Reference to configure traffic routing for Blue Green deployments.
Optional: Use Horizontal Pod Autoscaler (HPA)
This functionality is behind the feature flag CDS_SUPPORT_HPA_AND_PDB_NG. Contact Harness Support to enable the feature.
The Horizontal Pod Autoscaler automatically scales workloads based on CPU utilization or custom metrics. When you use HPA with Blue Green deployments, Harness creates separate HPA resources for the blue and green environments.
How Harness handles HPA in Blue Green
When the feature flag is enabled, Harness automatically creates blue and green HPA configurations that reference the blue and green deployments. The HPA resource name includes the color suffix (for example, test-hpa-blue or test-hpa-green).
HPA example with Blue Green deployments
Original HPA manifest:
apiVersion: autoscaling/v1
kind: HorizontalPodAutoscaler
metadata:
  name: hpa
spec:
  scaleTargetRef:
    apiVersion: apps/v1
    kind: Deployment
    name: nginx-deployment
  minReplicas: 1
  maxReplicas: 10
  targetCPUUtilizationPercentage: 50
Harness creates a blue HPA:
apiVersion: autoscaling/v1
kind: HorizontalPodAutoscaler
metadata:
  name: test-hpa-blue
spec:
  scaleTargetRef:
    apiVersion: apps/v1
    kind: Deployment
    name: test-deployment-blue
  minReplicas: 1
  maxReplicas: 10
  targetCPUUtilizationPercentage: 50
Using HPA without the feature flag
If you use HPA without enabling the feature flag, create separate blue and green HPA configurations manually that point at your deployments.
Manual HPA configuration for Blue Green
Create templates/hpa-blue.yaml:
apiVersion: autoscaling/v2
kind: HorizontalPodAutoscaler
metadata:
  name: {{.Values.name}}-blue
  labels:
    harness.io/color: blue
spec:
  scaleTargetRef:
    apiVersion: apps/v1
    kind: Deployment
    name: {{.Values.name}}-blue
  minReplicas: {{ .Values.autoscaling.minReplicas }}
  maxReplicas: {{ .Values.autoscaling.maxReplicas }}
  metrics:
    {{- toYaml .Values.autoscaling.metrics | indent 4 }}
Create templates/hpa-green.yaml:
apiVersion: autoscaling/v2
kind: HorizontalPodAutoscaler
metadata:
  name: {{.Values.name}}-green
  labels:
    harness.io/color: green
spec:
  scaleTargetRef:
    apiVersion: apps/v1
    kind: Deployment
    name: {{.Values.name}}-green
  minReplicas: {{ .Values.autoscaling.minReplicas }}
  maxReplicas: {{ .Values.autoscaling.maxReplicas }}
  metrics:
    {{- toYaml .Values.autoscaling.metrics | indent 4 }}
Add scaling configuration to values.yaml:
autoscaling:
  minReplicas: 1
  maxReplicas: 5
  metrics:
    - type: Resource
      resource:
        name: cpu
        target:
          type: Utilization
          averageUtilization: 20
    - type: Resource
      resource:
        name: memory
        target:
          type: Utilization
          averageUtilization: 20
HPA checks metrics every 15 seconds by default and adjusts replicas accordingly. When you use traffic routing with HPA, pods scale automatically as the new version begins receiving heavier loads.
Optional: Use Pod Disruption Budget (PDB)
This functionality is behind the feature flag CDS_SUPPORT_HPA_AND_PDB_NG. Contact Harness Support to enable the feature.
A Pod Disruption Budget defines the minimum availability threshold during voluntary disruptions. When you use PDB with Blue Green deployments, Harness creates separate PDB resources for the blue and green environments.
How Harness handles PDB in Blue Green
When the feature flag is enabled, Harness automatically creates blue and green PDB configurations and adds the harness.io/color label to the selectors.
PDB example with Blue Green deployments
Original PDB manifest:
apiVersion: policy/v1
kind: PodDisruptionBudget
metadata:
  name: pdb
spec:
  minAvailable: 1
  selector:
    matchLabels:
      app: nginx
Harness creates a blue PDB:
apiVersion: policy/v1
kind: PodDisruptionBudget
metadata:
  name: test-pdb-blue
spec:
  minAvailable: 1
  selector:
    matchLabels:
      app: test-deployment
      harness.io/color: blue
PDB can have minAvailable or maxUnavailable fields with absolute or percentage values. The selectors for PDB (.spec.selector) must match the controller's .spec.selector.
The release history contains the name of the stage PDB resource as part of the resource list, which the Scale Down and Scale Up steps use to manage PDB resources.
Review deployment execution logs
After you save and run the pipeline, you can review the execution logs to understand what Harness does during each step.
Stage Deployment step logs
Fetch Files: Harness pulls manifests and values.yaml from your repository.
Initialize: Harness initializes the services and deployment object, validating their YAML.
Prepare: Harness prepares two services, identifies the deployment color, and points the stage service at the pod set. In Blue Green deployments, resources are not versioned because rapid rollback works by routing traffic back to the original pods rather than redeploying previous versions.
Prepare section example output
Manifests processed. Found following resources:

Kind                Name                                    Versioned
Service             bgdemo-svc                              false
Deployment          bgdemo                                  false

Primary Service is bgdemo-svc

Created Stage service [bgdemo-svc-stage] using Spec from Primary Service [bgdemo-svc]

Primary Service [bgdemo-svc] not found in cluster.

Stage Service [bgdemo-svc-stage] not found in cluster.

Primary Service is at color: green

Stage Service is at color: blue

Cleaning up non primary releases

Current release number is: 1

Versioning resources.

Workload to deploy is: Deployment/bgdemo-blue

Done.
Apply: Harness applies services and deployment using kubectl apply with all manifests combined.
Wait for Steady State: Harness confirms the rollout completed and pods reached steady state.
Swap Primary with Stage step logs
The Swap step switches service selectors to route traffic to the new version.
Swap step example output
Selectors for Service One : [name:bgdemo-svc]

app: bgdemo

harness.io/color: green

Selectors for Service Two : [name:bgdemo-svc-stage]

app: bgdemo

harness.io/color: blue

Swapping Service Selectors..

Updated Selectors for Service One : [name:bgdemo-svc]

app: bgdemo

harness.io/color: blue

Updated Selectors for Service Two : [name:bgdemo-svc-stage]

app: bgdemo

harness.io/color: green

Done
On subsequent deployments, the swap alternates which color serves production traffic.
Scale down using shell script (alternative method)
As an alternative to the Blue Green Stage Scale Down step, you can add a Shell Script step in the post-deployment steps to scale down the stage environment.
Use the pipeline expression <+pipeline.stages.[stage_name].spec.execution.steps.stageDeployment.output.stageServiceName> to reference the stage service name dynamically.
Shell script scale down example
export KUBECONFIG=${HARNESS_KUBE_CONFIG_PATH}
kubectl scale deploy -n <+infra.namespace> $(kubectl get deploy -n <+infra.namespace> -o jsonpath='{.items[?(@.spec.selector.matchLabels.harness\.io/color=="'$(kubectl get service/<+pipeline.stages.nginx.spec.execution.steps.stageDeployment.output.stageServiceName> -n <+infra.namespace> -o jsonpath='{.spec.selector.harness\.io/color}')'")].metadata.name}') --replicas=0
Replace nginx with your stage name.
If you use a Delegate installed outside the target cluster, scripts must use ${HARNESS_KUBE_CONFIG_PATH} to reference the Harness-generated kubeconfig file.
This script example scales to zero replicas, which is suitable for single-deployment namespaces. If you have multiple deployments in the same namespace, add a label or selector specific to the deployment to avoid scaling down all blue deployments in the namespace.
Next steps
You have successfully created a Blue Green deployment pipeline for Kubernetes workloads. You can now route production traffic between two identical environments and roll back by switching services.
- Create a Kubernetes Rolling Deployment: Use a rolling strategy for workloads that do not require Blue Green
- Create a Kubernetes Canary Deployment: Deploy incrementally with percentage-based rollout
- Traffic Routing Step Reference: Configure advanced traffic management for Blue Green deployments